If I said:
"Give me one Dr Pepper and I'll give you back a Dr Pepper and a bag of peanut butter M&M's,"
You would say:
"Heck yes!"
Right?
Of course.
So this tutorial is basically like that.
If you love Ikea, raise your hand. *raises hand*
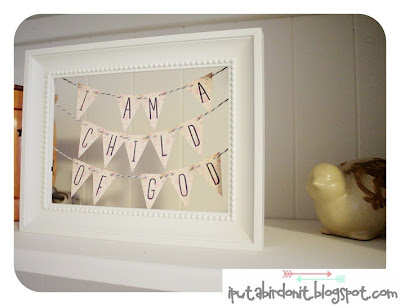
I love their picture frames -- especially this beaded one. Following this tutorial, you can get TWO cute display pieces out of just ONE frame, using the frame itself and the frame back w/ stand piece.
FRAME with BANNER
For this project, I took everything out of the frame and just used the frame itself. I used Silhouette Studio to create the pennants for my banner. The background of each letter is pink toile -- which matches the curtains in the nursery. The awesome thing about using a Silhouette cutting tool is that it cuts the holes for you for hanging with ribbon or twine or whatever you choose! I used bakers twine. Then, I just taped it to the back of the picture frame. You can't see the back, so no one will see your tape. :) Voila! Project Uno.
FRAME INSERT w/ STAND AS PICTURE HOLDER
This has to be one of the easiest projects I've ever done, and it is one of my faves! It is so simple -- which is my favorite thing about it. All you need to do is take the back piece of the frame (that has the stand attached to it) and hot glue a piece of burlap over the front. I cut my piece a couple inches wider than the frame insert, so I could wrap it around and hot glue it to the back. Again, the back doesn't have to be perfect, because no one will see it! Then, I attached a bronze mini clip to the front burlap {again, with hot glue}. That's it! I love it, because I can switch out the photo any time I want. Voila! Project Number 2.
Well, there you have it! A simple way to take ONE frame and make it into TWO adorable ways to display your favorite banner, saying, or photo. Mine are special pieces in Baby A's nursery. :) Have fun!
FRAME INSERT w/ STAND AS PICTURE HOLDER
This has to be one of the easiest projects I've ever done, and it is one of my faves! It is so simple -- which is my favorite thing about it. All you need to do is take the back piece of the frame (that has the stand attached to it) and hot glue a piece of burlap over the front. I cut my piece a couple inches wider than the frame insert, so I could wrap it around and hot glue it to the back. Again, the back doesn't have to be perfect, because no one will see it! Then, I attached a bronze mini clip to the front burlap {again, with hot glue}. That's it! I love it, because I can switch out the photo any time I want. Voila! Project Number 2.


.JPG)


