Hi there! I'm Becky from My Paper Craze, a bloggy-duo that I enjoy with my partner-in-crime {aka Mom}. We love searching on Pinterest, as well as inventing and experimenting with our own ideas! Our blog goal is posting {REAL} crafts for {REAL} life, so be sure to hop on over for home décor, kids crafts, holiday inspiration and {MORE}!
I am super excited {and honored} to swap guest posts here today with Daniela! Two heads are always better than one, and I'm sure you'll enjoy the projects we have for you! Definitely stop by my blog {click HERE!} to see what Daniela's got going on!
Today I want to share with you one of my first and {favorite} paper crafts...
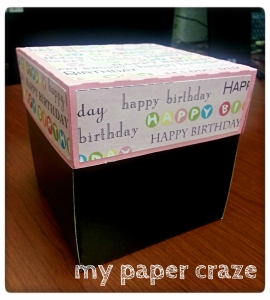
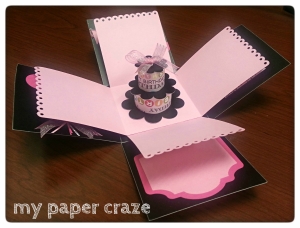
Not sure what an explosion box is? Allow me to give you a sneak peak... prepare yourself to be in awe {LOL}.
Isn't that cute? Imagine unwrapping an explosion box instead of a regular ole birthday card! You know what I love to use them for the most? Gift cards! You can create pockets in the sides to hold just about anything... we'll get to more of that later, though. So, does that pique your interest? Maybe you'd like to try out your skill at explosion boxes? Well, they are actually super easy, with or without a cutting machine!
Now, I will disclose that the above explosion box was created using the Scallop Explosion Box from the Silhouette Online Store. However, I've given you an easy template to follow to make your own by hand! Here's what you'll need:
-
Two 12x12 sheets of cardstock (the thicker, the better)
- One 12x12 sheet of patterned paper (to match the cardstock)
- Adhesive (a glue stick or glue gun will work if you do not have any scrapbooking tools)
- Embellishments, as desired
First step...
start with a 12x12 sheet of cardstock. If you'll notice, 12x12 will evenly create sections of 4" squares. Start by scoring (or folding if you do not have a score board) you cardstock at 4" and 8". Rotate and score again.
start with a 12x12 sheet of cardstock. If you'll notice, 12x12 will evenly create sections of 4" squares. Start by scoring (or folding if you do not have a score board) you cardstock at 4" and 8". Rotate and score again.

Step 2... After the scoring is completed, grab your straight edge cutter (or a pair of scissors) and cut inwards at the corners. See the diagram below for instructions. After cutting and detaching your corners, you should be left with the base of the explosion box.

Step 3... And what's a box without a lid? For the lid, you will cut your second sheet of cardstock down to a 6x6 square and score around the edges at 1".
Step 4... After scoring around the lid, you'll cut tabs as diagramed above (it reminds me of a pinwheel, lol). These tabs or flaps will be used to connect the sides of the lid.
This completes the outside of your explosion box. If you choose to have a second layer of paper inside, repeat steps 1 and 2, just a little smaller so it will fit inside your box. As you can see below, since I chose plain cardstock, I dressed up the outside of my lid with matching patterned paper.

Step 5... Embellishments! This is the best and often most difficult part. For this Happy Birthday Explosion Box, I chose to go with a simple design, decorating each side with a small birthday accessory. Don't forget to leave an area to write a sweet note to your recipient! Also, it's not super important, but I find it easier to decorate my sides before I add my inside layer of paper or card stock.
Step 6... Inside layering. On this particular "basic" explosion box, I kept it simple and only added one layer inside my box. The more embellished the box, you may choose to create several layers of coordinating paper to add extra flair with the box it opened. You can create layers of photos for a memorable box or pockets to hold love notes for your sweetie! Don't limit yourself, be sure to explore all options! Be sure to check out Pinterest and Google Images for design ideas!
Step 7... Centerpiece! For some reason, the centerpiece always seems the easiest for me, but don't get discouraged if you don't have an idea right away! I chose a layered cake because I am creating a birthday box, but some other ideas include a photo cube, a printed invitation or announcement, a cute paper flower... again, search for some great ideas to add that pizzaz to your box!
Step 8... Assembly! Once assembled, here is what your {AMAZING} explosion box should look like!
*****************************
Oh my goodness, isn't Becky's explosion box amazing?! I love it so much. What a cute gift idea! You could make one for any occasion or holiday, too. Here are some of my fave posts from My Paper Craze:
Like Becky said, I am guest posting on her blog, so definitely stop by and see the LUCKY & sweet project I am sharing. Here is a sneak peek...
{click HERE}
click below to download St. Patrick's Day Stencil
Have the best day!
xo
**BUY A MATERNITY COUNTDOWN SHIRT HERE!**


omg i m loving it u described i such an ez way i m on it
ReplyDelete