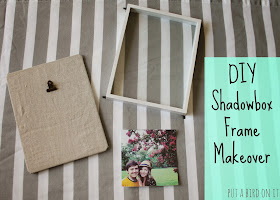
Today, I've got a home decor DIY that would go great in a new home, an old home, an apartment and everything in-between! I originally shared this post on Belle of the Kitchen. At Target {of course} I found some discounted shadow box frames. The one in the picture below is super similar to the ones I bought, except the inside part was NEON YELLOW. Not that I don't love me some neon, but it wouldn't work with my home's color scheme. I decided to buy the frames anyway, since they were so cheap, and do a little burlap makeover to make it an interchangeable picture frame. Read on to see how easy it was!
You only need a few supplies for this fun project: Shadow Box Frame, Burlap {or other fabric of choice}, hot glue gun and a clip of some sort. That's it!
Tip: Craft stores often have great picture frames sales. Get the store's app on your phone for coupons, too!
There are only 3 steps!
First, remove the back {the part with the stand} of the shadow box frame. Cut your piece of fabric to cover the front and fold over an inch or so over the back. Hot glue the fabric in place. It doesn't need to be pretty - no one's going to see the back! Second, hot glue your clip to the front of fabric. Third, attach your fave photo or printable quote to the clip, replace the backing, and you're done!!
First, remove the back {the part with the stand} of the shadow box frame. Cut your piece of fabric to cover the front and fold over an inch or so over the back. Hot glue the fabric in place. It doesn't need to be pretty - no one's going to see the back! Second, hot glue your clip to the front of fabric. Third, attach your fave photo or printable quote to the clip, replace the backing, and you're done!!
I made 3 of these frames, since it was so easy. I loved the burlap fabric, but also thought a fun floral or stripe pattern would be cute with a fave printable or quote. You could frame kids' artwork or family photos, too! I love that they have the simplicity of a regular picture frame, but the dimension of a shadow box. I put photos of the most recent vacation we went on. These frames are awesome, because you can change out the photos whenever you want!
You can follow my > Printables Board < here, if you need some ideas for cute prints or quotes to put in your frames! 'Til next time, friends. :)


Daniela this came out SO cute! I might need to pick up a frame and try this out for myself :)
ReplyDeleteThanks, Alyssa! These frames are my favorite of any in my house. Have a great day! xo
ReplyDeleteWhat a fun, easy idea! I love burlap, it's one of my favorites for DIY projects.
ReplyDeleteThis is SO SO cute Daniela!!! Love it!!
ReplyDeleteI love using burlap, too! It will never get old to me. xo
ReplyDeleteTHANKS!! That means a lot! Take care, Danielle! xo
ReplyDeleteLove this!! Thank you for sharing at the Thursday Favorite Things Blog Hop. Watch for your feature on Monday xo
ReplyDeleteThis is so cute! Pinned! Thanks for being a part of our party. Please join us tonight at 7 pm. We feel honored when you stop by! http://loulougirls.blogspot.com
ReplyDeleteHappy Monday! Lou Lou Girls
Thanks so much for sharing on Bloggers Brags Pinterest Party!!
ReplyDeleteLove this idea1
ReplyDeletePinning! Thanks for
linking up with the Four Seasons Blog Hop!
Sandra from Scrumptilicious4You