photo PABOI2.jpg

Weekly Digest

 photo PAGEShome1.jpg  photo PAGESlinkparty1.jpg  photo PAGESfeatured1.jpg  photo PAGESsponsor1.jpg  photo PAGESguestposts1.jpg

Search This Blog

Tuesday, March 25, 2014

Guest Posting at Get Silvered ... How to use Silhouette Stencil Material ... PLUS an Ad Space Giveaway!

What up, peeps? Today, I have the pleasure of hanging out at Get Silvered, where I am sharing my review of Silhouette Stencil Material. Spoiler alert: IT'S AWESOME! I use vinyl for stencils ALL the time - mainly for making the Maternity Countdown Shirts I sell online - and making a new vinyl stencil for each one takes up a lot of vinyl. I was intrigued when I saw that Silhouette sold a "stencil material" that was reusable! Head over to Get Silvered to see my full review and get a tutorial on how to use this kick A stuff. :)


WAIT!

HANG ON!

DON'T GO!

I'll miss you.

To keep you HERE ... I have an exciting announcement!

Monday, March 24, 2014

DIY Polka Dot Pants

We've all seen them. An adorby pair of polka dot pants in your fave store just hanging there saying "Buy Me" - "Buy Me". The other part we also see? The price tag. OUCH! Keeping up with the latest trends can get pricey pricey these days. BUT. Thankfully. There is a way to get your polka on (literally) without breaking the bank. Three little letters: D-I-Y. It doesn't get much simpler than polka dot pants. You only need 3 ingredients: pants, fabric paint & foam pouncer. Read on, my friends. Read on.


I went to Deseret Industries ("D.I." - as we call it - a LDS thrift store) and bought a pair of used skinny jeans for $3. One time through the wash and they are good as new.


You can buy fabric paint, or make your own. I always opt for making my own. SO cheap and easy to make just a little for your current project. Buy a fabric medium and mix 2 parts paint with 1 part medium. I use a couple cupcake liners stacked to mix my paint. That way, I can toss it when I'm done.

Friday, March 21, 2014

Everything You Ever Wanted to Know About Your Bathrooms ... Guest Post by Susan of My Bathrooms Blog

Hi my name is Sue Jason and I am a blogger at My-bathrooms blog. I have a passion for sharing ideas which include home improvement and decor. You may follow us on Facebook, Twitter, Pinterest and Google Plus

Everything You Ever Wanted To Know About Bathroom Decor!
Your bathroom is ready for a makeover and, at long last, you have managed to put the funds together to achieve the bathroom of your dreams. But… where do you actually start? It is all too easy to rush off to the nearest showroom, tour around for what feels like hours and leave with your head spinning with designs, systems and statistics and STILL have no idea what you want for your own bathroom!

Wednesday, March 19, 2014

Link'n Blogs #17 & a giveaway!

Giveaway Winner: Sonnet R. !!

We are happy to have a giveaway from Starburst Studio as party of this week's link party! Be sure to enter after you link up your lovely posts! {you can enter without linking up, too!} xo

Welcome to Link'n Blogs {#17} !
A place to link up your projects and make new friends. We are all about visiting links and following new bloggers here at Link'n Blogs. Remember to leave comments and PIN PIN PIN!
Cause sharing is caring. 

**Your links will show up on ALL blogs hosting the link party!**

Interested in guest hosting Link'n Blogs?!
I've created a spreadsheet where you can sign up to host a link party! It's a great way to get to know other bloggers, share a recent post with other party goers and pick the features. Sign up using the link below!

Grab my party button! 


I am sharing a tutorial for cutting fabric with your Silhouette Cameo (or Portrait). Seriously, once you try this, you will want to add fabric to all your projects!


How to Cut Fabric with your Silhouette Machine


HOST:
Katelyn from Learning, Creating, Living 


Katelyn is sharing those amazing succulent planters. And guess what? They're not real! I almost didn't believe it when I saw the photo, but check out her post and see how EASY it is to make faux planters!


Be sure to give some love to our guest hosts - you will love their creative blogs!


I love Cindy's post on why your blog needs social sharing buttons. If you have a blog, you MUST read this article. I thought I had everything, but you never know what you might be missing to enhance your blog!


Sonnet has the cutest prints in her Etsy shop! She also has a blog to share DIY projects and crafts to inspire you. Sonnet is sharing with us this gorgeous succulents wreath. I'm loving all the succulents projects!


Here are this week's features:

Wednesday Roundup ... 10 Ways to Wear Tulle Skirts

The pin that started it all.

source

And I was a goner.

I knew I needed a tulle skirt. Yep. I said it. NEEDED. One sale at Poppy and Dot and my dream became a reality. I have a cream tulle skirt. And LOVE it. LOVE LOVE LOVE it. I wear it almost every other Sunday to church. LOVE it. Today's Wednesday Roundup showcases 10 ways to wear tulle skirts. But don't say I didn't warn you. You will NEED one after you read this post. Proceed at your own risk. :)


Be bold. Pick a colorful skirt and keep the rest neutral.


source

Tuesday, March 18, 2014

Guest Posting at Today's The Best Day ... Homemade Baby Vapor Rub

Hi pretties! I just wanted to let you all know that, yesterday, I guest posted over at Today's The Best Day and shared a natural remedy for baby's congestion. Skip the Vick's - use a homemade vapor rub for baby, instead! Head to Danielle's blog to see the full post. 


And don't forget to enter the current >> GIVEAWAY << I'm part of, while you're here!

xo

Silhouette Cut File and Card Tutorial ... Guest Post by Pam from Get Silvered

Hello, I'm Pam from GetSilvered.com and I'm so happy to share a project here at Put a Bird On it.
Thank You Daniela, it's a pleasure to be contributing to such a creative site.


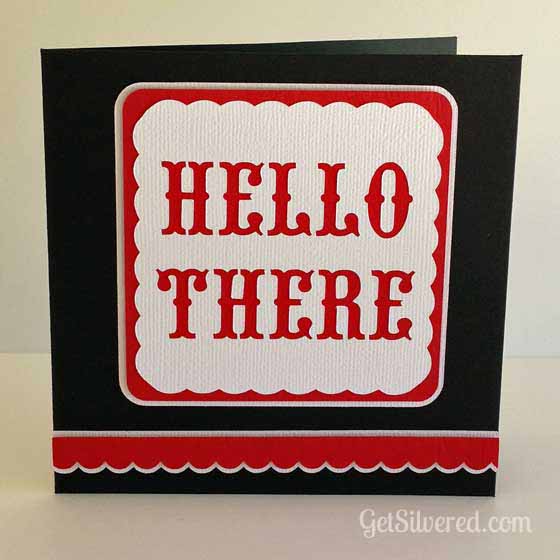
I'm sharing a Cutting File and instructions to make this cute card with a Silhouette Cutting Machine. It's perfect for many occasions and best of all - it's quick and easy.

Supplies:

3 Colours of Card stock |  Silhouette Studio File >> Free Download here  | Double Sided Tape  |  Double Sided Foam Tape & Squares  |  Glue Pen  |  Scissors  |  Silhouette Cutting Machine  |  Patterned Paper (optional)  |


Instructions:
  •  Download & open the free file in the Silhouette Studio Software 
Cut The Pieces:
  • First cut the card base: Load the Black Cardstock onto the cutting mat and into the Silhouette, then adjust the Cut settings in Silhouette Studio to correspond with the thickness of cardstock being used.
  • The files are laid out as in the screenshot below. Ungroup & move the other shapes off the Virtual Mat on the computer screen, leaving only the card base and select ìsend to Silhouetteî
  • Repeat again to cut out the Scalloped Borders, Squares and Text overlay with the contrasting cardstocks. Refer to the colour guide on the file (see screenshot above) & change cardstock on the real cutting mat and move the various shapes on or off the virtual cutting mat as needed.
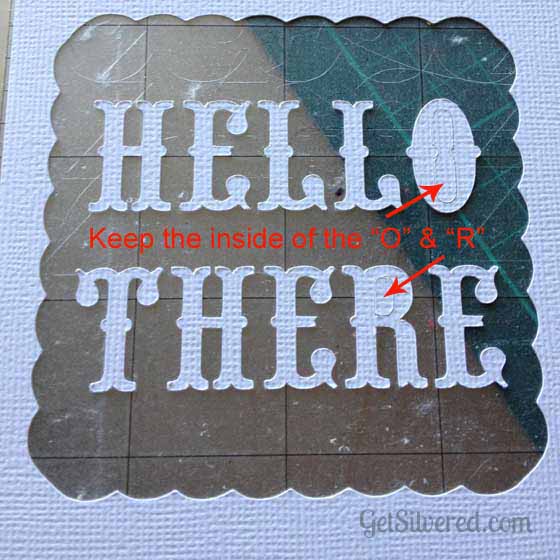
  • When removing the text panel from the cutting mat, keep the cut outs from the centre of "O" & "R" as theyíll be needed  later. You may be able to save the letters for another project too.

Assemble the card:
  • First, attach the White Text overlay to the Red backing Square. Use Double sided tape on the back over the solid areas and a glue pen around the intricate cut out sections near the letter cutouts. 
  • Now fix the combined layers to the large white backing square with Double sided foam tape. Apply the little foam squares (or foam tape cut to size) to the back of the red scalloped border and attach that on top of the larger white scallop. Using the foam tape gives dimensional interest to the card. 
    • Carefully position and attach the assembled panels and scallops onto the Card base with Glue or Double Sided Tape. Attach the middle pieces (if you haven't already done so) of the "O" & the "R" that you saved earlier.
     
      
     Options:
    • You can really change the style depending on the materials used. I love the Red, Black and White colour theme, but just for something different I made another version too.  This time I used a patterned paper instead of a contrast card, and added an extra scalloped border. 
    • I didnít have any card or paper in a wood grain pattern so I attached contact paper to a piece of plain cardstock and then cut it all together using the heavy cardstock settings in the program.
    • The cards are blank inside, but you could add an extra panel with a printed greeting or add a cut out sentiment or a sketch pen greeting. If sketching or printing, do it before you cut out the card base.
    • You can add extra design elements inside too ñ I added a scalloped border & a heart to the inside of the Kraft card to pretty it up!
    Enjoy this easy card project and the Free Cutting File. If youíre looking for more Cardspiration, there are lots of other Free Cutting Files at Get Silvered if youíd like to take a peek, or follow my Facebook page  for all the latest updates.
     
    Next week, Daniela will be contributing over at Get Silvered. I'm really looking forward to her awesome Home Decor project. Be sure to look out for it!


    *****************************


    Thanks, Pam! I asked Pam to do a card project, because I don't tap into card making & paper crafting as much as I would like to. I love seeing all the intricate layouts that scrapbookers do. I definitely want to get into making homemade cards, since I have a Silhouette Cameo.

    Here are some of my fave posts from Get Silvered:

    **EEEK! This idea is total #swoon


    What is your favorite thing to make with a cutting machine? I love hearing all the different things people create! Have a great day!

    xo

    Enter to win Ad Space on my blog for the month of April! Click HERE!

    Let's be photo junkies together >> Instagram @putabirdonitblog
    Blog Design By Brand Me Beautiful