


- Sample fabric from Joann Fabrics
- Wooden embroidery hoops (1 - 6in x 6in, 2- 4in x 4in, 2- 3in x 3in)
- Embroidery Thread
- Pencil
- Fine point sharpie
- Buttons
- Hot glue gun
- Batting
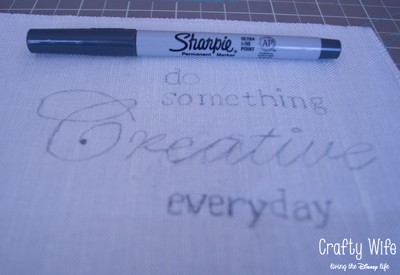
I laid the computer paper underneath my sample fabric and traced the words on to the white linen with a pencil. After I was done, I went over the letters with a fine point sharpie.
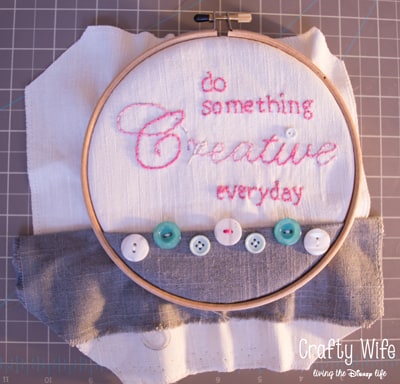
Using a back-stitch, I traced the letters (by hand) with my pink embroidery thread. Depending on how long the quote is this part of the project can take a long time (it took me about three hours!). Once the quote was done, I decided to add a few buttons to bring out the green on my computer chair.
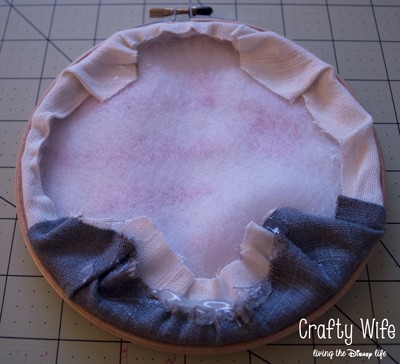
If you have a lot of excess fabric on the outside of the hoop, cut it down (but not short enough that you can't fold it over the back when the time comes). Then cut a crude 6in. by 6in. circle out of the batting.
Pull the fabric as tight as you can around the sides of the hoop. Use the hot glue gun to attach the fabric to the backside of the hoop. Then, place the batting on the backside and glue it down as well. After the glue dries, turn it over and admire your work!
This was a fun way to bring color and inspiration to my work space. It may have taken a little longer than I expected, but I am incredibly happy with how it looks.

Thank you Daniela for letting me share this fun project with you! Have a great weekend everyone!
********************************
I love Teresa's project, don't you? You should definitely see the rest of her craft room - including that fabric corkboard you get a sneak peek of in the pic above. I love it! Be sure to stop by Crafty Wife and visit Teresa's blog!
Here are a couple of my fave posts from Crafty Wife:
ALL the Disney posts!

DIY Bow Clutch

Don't forget to link up at Link'n Blogs this week. I love this week's features! Plus, my guest hosts are just fabulous, as usual. There is a spreadsheet to sign up for being a fab guest host, if you're interested. I'd love to have you!
Link'n Blogs #13

I also have two great giveaways going this week! Definitely enter to win some awesome prizes! I love bringing my amazing readers FREE STUFF. :)
Win over $100 in Radiant Orchid goodies

Win an adorable baby/toddler tee or onesie from Boughtin Baby & Bride


Let's hang out this weekend! Follow me on Instagram >> @putabirdonitblog
+1 anyone? Hit me up on Google+ >> Daniela Walsh
********************************
I love Teresa's project, don't you? You should definitely see the rest of her craft room - including that fabric corkboard you get a sneak peek of in the pic above. I love it! Be sure to stop by Crafty Wife and visit Teresa's blog!
Here are a couple of my fave posts from Crafty Wife:
ALL the Disney posts!
DIY Bow Clutch
Don't forget to link up at Link'n Blogs this week. I love this week's features! Plus, my guest hosts are just fabulous, as usual. There is a spreadsheet to sign up for being a fab guest host, if you're interested. I'd love to have you!
Link'n Blogs #13
I also have two great giveaways going this week! Definitely enter to win some awesome prizes! I love bringing my amazing readers FREE STUFF. :)
Win over $100 in Radiant Orchid goodies
Win an adorable baby/toddler tee or onesie from Boughtin Baby & Bride
I hope you all have a fantastic weekend! My brother is visiting with two of his kids {from Washington}! I don't get to see him very often, so I'm super excited to hang out with them and have Ava play with her cousins. I also have a couple FUN guest posts I'm working on {think baby leggings and St. Patrick's Day...}, plus a couple great Sponsor posts to share. Next week is going to be LOTS of fun!
I don't normally post on Saturdays, but check back here TOMORROW. I may have reached a blogging milestone and I may be getting a little personal on the blog about it. All good things, of course! If you want to learn a little more about the gal behind Put A Bird On It, you'll definitely want to read tomorrow's post. See you later! Remember to CHOOSE HAPPY. :)
xo
+1 anyone? Hit me up on Google+ >> Daniela Walsh

No comments:
Post a Comment
Thanks for the chat!