photo PABOI2.jpg

Weekly Digest

 photo PAGEShome1.jpg  photo PAGESlinkparty1.jpg  photo PAGESfeatured1.jpg  photo PAGESsponsor1.jpg  photo PAGESguestposts1.jpg

Search This Blog

Showing posts with label frames. Show all posts

Wednesday, August 21, 2013

One Frame --> 2 Ways!

If I said:

"Give me one Dr Pepper and I'll give you back a Dr Pepper and a bag of peanut butter M&M's,"

You would say:

"Heck yes!"

Right?

Of course.

So this tutorial is basically like that.


If you love Ikea, raise your hand. *raises hand*
I love their picture frames -- especially this beaded one.  Following this tutorial, you can get TWO cute display pieces out of just ONE frame, using the frame itself and the frame back w/ stand piece.

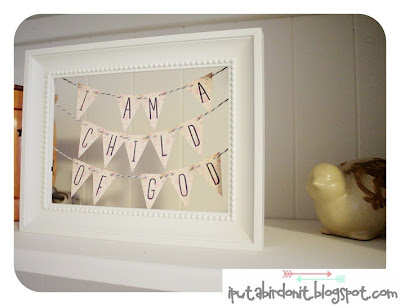
FRAME with BANNER

For this project, I took everything out of the frame and just used the frame itself.  I used Silhouette Studio to create the pennants for my banner. The background of each letter is pink toile -- which matches the curtains in the nursery. The awesome thing about using a Silhouette cutting tool is that it cuts the holes for you for hanging with ribbon or twine or whatever you choose! I used bakers twine. Then, I just taped it to the back of the picture frame. You can't see the back, so no one will see your tape. :) Voila! Project Uno.



FRAME INSERT w/ STAND AS PICTURE HOLDER
 This has to be one of the easiest projects I've ever done, and it is one of my faves! It is so simple -- which is my favorite thing about it. All you need to do is take the back piece of the frame (that has the stand attached to it) and hot glue a piece of burlap over the front. I cut my piece a couple inches wider than the frame insert, so I could wrap it around and hot glue it to the back. Again, the back doesn't have to be perfect, because no one will see it! Then, I attached a bronze mini clip to the front burlap {again, with hot glue}. That's it! I love it, because I can switch out the photo any time I want. Voila! Project Number 2.


  Well, there you have it! A simple way to take ONE frame and make it into TWO adorable ways to display your favorite banner, saying, or photo. Mine are special pieces in Baby A's nursery. :) Have fun!


Wednesday, August 8, 2012

I Love You Because

My sister has been seeing all those cute I Love You message boards all over and was about to buy one online, but instead asked me to make one for her. I was just flattered she thought of me and trusted her marital love expression in my piano-playing-turned-craft-making hands. I was EXCITED to tackle a crafty request - especially for my sister, but I was NERVOUS at the same time. It's easy enough to make something for yourself...if it looks bad, I can deal. But making something for someone ELSE makes me second guess every step! Hopefully we can still have our Thursday night Friends-watching-pizza-eating parties even if she doesn't like it.

Her only request was that it be big enough to write decent sized messages on and that it uses the colors BLUE & ORANGE (she's been straying from the normal 'black & red' fave...that color combo is out!). One stop at Michaels...a crafting Skype call with the BFF...and a whole lot of LOVE later...here is the final result:

Friday, July 27, 2012

Burlap and polka dots...and some inspiring words

My friend and I have this thing we do where we set goals together. Different for each of us, but we share them and talk about them. As of yesterday, we are on goal 106 {ok, slight exaggeration}.  Some are big {I will practice the piano every week}, some are small {I will have water with my lunch instead of that delicious dr pepper}, but they are meaningful to us. Some of my goals make me emotional...some come from regret...but they are there to keep me going, to keep me improving myself, and to remind me of the full potential within me. I found this quote by c.s.lewis, one of my favorite authors, and immediately fell in love with it. It is now proudly displayed in my kitchen, where I can see it every day and be reminded of the goals I've set and encourage me to keep trying {and it helps to have my latest loves burlap and polka dots, too!}.


Wednesday, July 25, 2012

DIY Message Board

My good friend got married almost one year ago, so I thought it's a good time to post the message board I gave her for a wedding present!  I had to go out and buy my first hot glue gun!!  It was also my first time attempting rolled fabric flowers.  Kind of gutsy to have all these FIRSTS be for a project I was giving to someone else, but hey, we're still friends, so it must not have been too awful.  All I needed was fabric scraps, glue gun, empty frame, cute piece of paper, vinyl letters, dry erase marker and velcro squares.

I asked my friend what her wedding song was, and it contained the line "You are my Shining Star."  I thought this was PERFECT for the beginning of an "I love you" message board, so every day they could share a reason why the other was their Shining Star.  I'm in love with the paper I put in the frame, as a background -- it had bubble flowers on it!  You can't see on the backside, but I purchased a small dry erase marker, attached one part of a velcro square to the marker cap, and attached the other half of the velcro square to the back of the frame.  That way, the marker is nearby and you're not going to lose it!

There are SO many message boards, dinner menus, calendars, etc. you can make with an inexpensive frame and a dry erase marker!


Blog Design By Brand Me Beautiful