photo PABOI2.jpg

Weekly Digest

 photo PAGEShome1.jpg  photo PAGESlinkparty1.jpg  photo PAGESfeatured1.jpg  photo PAGESsponsor1.jpg  photo PAGESguestposts1.jpg

Search This Blog

Showing posts with label no sew. Show all posts

Saturday, January 11, 2014

West Elm Inspired Sharpie Mugs

Hi friends! I had the pleasure of guest posting at Polish & Pipsqueaks a couple weeks ago. I shared my West Elm Inspired Sharpie Mugs! Everyone has been so sweet with their responses. In case you missed my guest post, I'm sharing the tutorial here on my blog, so you can get in on the knock off action. I hope you find some DIY inspiration here!


Today, I am sharing with you my favorite project to date. West Elm Inspired Sharpie Mugs! I've been eyeing these West Elm polka dot mugs forever. I'm a sucker for anything with polka dots! But they are pricey -- especially if you want more than one. I have a super inexpensive and easy DIY project that gets you the polka dot mug of your dreams and lets you keep that cash in your piggy bank. Here at Put A Bird On It, I am all about using stuff you already have at home -- or can get on the cheap -- and turning into a Pinterest worthy item. And sharpie mugs are exactly that! 


 Here's what you'll need:

The Goods
Ceramic mug
Sharpie
Oven
yep - that's it!
The Fun Part
Clean your mug. I just wash it with soap and water, but I've heard rubbing alcohol works well, too. Time for the fun! Draw your design on your mug. Write a phrase, draw a picture, put your name, draw one of the Hemsworth brothers -- whatever you want! I sketched my words out on a piece of paper first, so I had a battle plan in place before drawing on my mug. The last step is baking your mug. You'll bake it at 350degrees for 30 minutes. Place the mug in the oven during preheat. After the 30 minutes, turn the oven off and let your mug cool completely in the oven. This will help prevent cracking. You're done!
{ Tips}
{The cheaper the mug -- the better! You don't want a thick, shiny glaze on your mug, so head to your local dollar store or Walmart.}
{If you are nervous about your design fading or chipping, use an oil based Sharpie. You can also get oil based paints from a craft store. I wanted cheap -- so I used a 3-pack of metallic Sharpies from Target. They worked just fine!}

This mug was so easy -- I made a second one with my "phrase" for 2014. CHOOSE HAPPY.


If you make your own Sharpie Mug, link it up here. I'd love to see what designs YOU come up with!

xo

**BUY A MATERNITY COUNTDOWN SHIRT HERE!**


************************************************

Enter the fab giveaways I'm currently hosting!

Don't forget - today is your LAST DAY to enter to win a free family pass to Baby Animal Days in Utah this weekend! Enter > HERE <

Also, I am giving away a $550 Amazon gift card with some other great bloggers! Enter > HERE <


************************************************

Check out Pick Your Plum for today's daily deal!

Monday, December 9, 2013

DIY No Sew Tulle Tutu

Tomorrow is Ava's first birthday! I can't believe one year ago today, I was having my last child-free day. I was so nervous about labor and being a mom. I wish I could go back and talk to my 9month pregnant self and tell her to not worry, that everything would work out okay better than okay.

To say I am EXCITED about Ava's first birthday is an understatement! This marks the best year of my entire life. The JOY that Ava has brought into my life, my marriage, our family and our home can't be described in words. So I won't try. It's only something that can be felt.

I want her first birthday to be special. I know "she won't remember it," but I will. Her photos will. And I want her to feel that tomorrow is a more special day than the others. I made her a glittery pink, white and gold birthday tutu. I CAN'T SEW! But I did find an AMAZING tutorial on how to make a NO SEW tutu. I'm not even going to do my own tutorial, because the tutorial from Make It and Love It is what I used and I can't possibly say or show it any better than Ashley did. Be sure to CLICK ON THIS LINK to see her tutorial {and tell her who sent you!}. I love giving credit to other bloggers, because, well, come on, we all get ideas from other people and HELLO Pinterest, so they deserve to know they have inspired someone else. I love when I get a blog comment that someone made something I shared or was inspired by something I did. It seriously makes my day! Ok. Back to the tutu-torial. It is VERY easy. VERY inexpensive. But is kind of time consuming. I spent 2 hours making Ava's tutu. Just pop in your favorite movie and you'll be done by the end!

WARNING! WARNING! WARNING!
IF YOU WANT A GLITTER BOMB TO GO OFF IN YOUR HOUSE, I RECOMMEND THE GLITTER TULLE.
IF YOU DON'T WANT GLITTER EVERYWHERE FOR DAYS, USE PLAIN TULLE!

I really wish I'd have had my own warning before making Ava's tutu. Yes - the glitter tulle is adorable - but it is SO MESSY. I'm still picking glitter off my clothes, carpet, and out of my mouth & hair. Take caution if you want it glittery! I will probably be making a different tutu for Ava to wear around the house, since the glitter, as Anakin Skywalker once said, "it gets everywhere."

Have fun making a tutu! It is SO easy. You can make any size you want. My sister-in-law made matching witch tutus for her and her daughter for Halloween a couple years ago. It's so easy and fun!

HUG someone you love tomorrow in honor of Ava's birthday! :)


FACEBOOK  /  INSTAGRAM  /  TWITTER  /  PINTEREST


Don't forget to enter my Washi Tape giveaway! Ends 12/9!

Monday, November 18, 2013

Burlap & Polka Dots Quote Display *GIVEAWAY*

Happy Monday!

Today, I am excited to share my easiest craft ever.

But you can't find it here!

Nope. I am GUEST POSTING on Best Day Ever!

Head on over for a full tutorial and chance to WIN one of these cute quote displays with a 12-pack set of my favorite quotes.

Happy Monday!


Printables by A Step in the Journey and Simply Kierste
 
Love the quote I'm displaying from President Monson? Click the link below to download for FREE!


Free Printable - President Monson Quote


*Want to PIN an image for later? Hover over any photo on my blog and the PIN IT button will appear in the top left corner!*

Monday, November 11, 2013

DIY Music Christmas Ornament

I don't know if you know this about me, but I love music. I started playing the piano at the age of 3. I've played ever since. Music has always held a very special place in my heart. When I was little, anytime I was sad or having a bad day, I would sit at the piano and just play. Within a few minutes, my mood was always a little better and my burdens a little lighter. To this day, music still touches my soul with it's power to move people.


I've always wanted to do a music themed Christmas tree.  I saw one at The Festival of Trees here in Utah last year and LOVED it. So when my sister asked me to help her make homemade Christmas ornaments last week, I knew I HAD to make a music themed ornament. We had to make 40 ornaments in one night, so I also knew I wanted it to be SUPER EASY and not very inexpensive. I created THIS little beauty. I love it SO much. You can use any sheet music inside you want. I was making 20 ornaments, so I printed off 5 sheets of 4 different Christmas songs. I downloaded them for free online {click here for the website}. The rest of the supplies you need are clear ornaments {I bought mine from Michaels - use a coupon!}, scissors, ribbon, bakers twine. That's all! The tutorial is below. Get your craft on!


Stick around! Click "Join this Site" on the right sidebar to follow my blog. Let's be Instagram friends, too!


Thursday, November 7, 2013

How to Dye Fabric {with your washing machine}

Why would anyone possibly want to dye fabric?? I get for making your own clothes, or maybe quilting, or sewing, or something else that this girl doesn't do. But seriously - I never thought I would be purchasing fabric dye - using it - and loving it. But I did. To make a DIY Baby Wonka Bar Costume. Click the link to read all about that little Halloween chocolatey adventure! I needed a brown baby nightgown, but that kind of didn't exist either. Anything I found was too patterned or way too pricey. ENTER: FABRIC DYE. I ordered a white, cotton baby nightgown off Amazon for $13 {plus free shipping through Amazon Prime}, plus the $3 bottle of fabric dye and my project is costing me less than $20. And it REALLY WAS EASY! The fabric dye instructions are clear and, if you follow them, you won't fail. Oops. I didn't follow them the first time and, yep, I failed. Turns out - fabric dye does not like polyester. So don't do it. Don't try. Don't think you'll be the magic exception, because you won't be, like I wasn't. Just stick with the approved fabrics. CLICK HERE for a link to the FAQ section of Rit Dye's website. It was super helpful and answered any questions I had! I only used RIT Dye, because it is sold at Joanns, so easy to obtain that first errr second bottle of dye.


Supplies
  • Fabric dye
  • Fabric
  • Washing machine {I used my washing machine, but you can do it by hand!}
  • Dr Pepper {yep, a total necessity for the wait time during washing}

 The Fun Part
  • Set the temperature to wash HOT and rinse COLD.
  • Set the cycle to wash twice and rinse once. My washing machine has an 'auto soak' setting, so it basically washes it for a long time, then rinses once. If yours doesn't have this setting, just watch for when the wash cycle finishes, then RESET to wash again.
  • Start the water running. Wait until it gets about half full, then add the fabric dye. I used the entire bottle, just to be sure, and I knew I wouldn't need to save it for any reason. The link above to the FAQ section of RIT Dye gives details on how much to use depending on what you're dying.
  • The fabric needs to be unfolded and damp before adding to the dye. This is super important! I didn't unfold my fabric on one item and it came out splotchy! I just use the running water to dampen my fabric.
  • Once your fabric is damp and unfolded, add to your lovely dyed water.
  • Sit back - drink that DP - and wait for the magic to happen.
That's it! If you have to reset your washing machine after the first wash part, remember to pay attention, so you don't miss it. I hang my fabric to dry. The End!

SOOO easy, right?? I can't wait to try other fabrics for other projects. Fabric dye has kind of opened up my mind to a whole new world of color. Don't let not finding the right color of fabric or clothing item for your project stop you from fulfilling your chocolatey Wonka-y dreams.

"We are the music makers...and we are the dreamer of dreams." - Willy Wonka


Tuesday, November 5, 2013

DIY Baby Wonka Bar Costume

It all started when a certain spouse of mine decided Ava should be a WONKA bar for Halloween. *sigh* He might have a slight obsession with the Willy Wonka movie -- the old one -- not the Johnny Depp version. Well, you can't just go out and BUY a baby wonka bar costume. They don't exist. Even if you could, I wouldn't, because Halloween costumes cost one gajillion dollars. So I knew I had to get my craft on if I was going to make my husband's Halloween dream come true. And it really wasn't even that hard. I can't sew. Nope! I even have my grandmother's sewing machine, but I've never learned. That's definitely on my TO DO list. But, until then, it's a no-sew life for me. I decided to use fabric dye and fabric paint to make Ava's wonka bar costume. Like I said earlier - it wasn't even that hard. YES - I did fail the first time I tried fabric dye. And YES - I thought about giving up. And YES - I did eat almost 100 mike & ike's out of frustration. But it all worked out in the end.

SO.

To check out how to dye your fabric brown, click HERE for my Fabric Dye Tutorial.

In order to do this, you will need my Wonka Bar Costume stencil. You can find it {along with my other Free Printables & Stencils} by clicking on the links below:


Now, don't you feel super special knowing you are one of the ONLY people on the planet to have a Wonka bar baby costume stencil??!!!! Welcome to the cool kids club.

I'm definitely a visual learner, so the rest of the tutorial will be through pictures. Have fun! And remember -- candy is dandy, but liquor is quicker.

**Note: I used fabric paint, because I'm kind of obsessed with it, but you could use heat transfer material, too. Just cut out the different shapes and letters in the colors you want. That would work quite splendidly!**


Pull up the stencil file in Silhouette Studio. You'll have to change the settings to looks like these. The main ones to note are:  change the width to 9 and the height to 15 and change the cutting mat to NONE. These are the settings I used for a 6-12mths size baby nightgown. You can adjust to whatever size you need. 


**Hover over top left of photo to PIN!**
1. Load your vinyl in your Cameo or Portrait. I used 9" vinyl, but you can use 12" as well. 
2. In Silhouette Studio, send the file to the Cameo to cut. Once you choose the Vinyl as the item you're cutting, the rest of the settings change for you. Remember to make sure you have your blade in your Cameo set to what setting it shows on your computer screen. Once it's all set, press CUT! Sit back, and watch the magic.
3. Cut off your vinyl stencil!
4. Using your hook tool for assistance, peel away the letters and border, so you have the negative space left.
**here's a tip. if you don't have a hook tool {yet!}, i've used a fondue fork or even scissors to help peel away the vinyl. but the hook tool works the best!**
5. Apply the transfer tape to the front of your stencil. I peel a small portion off and press it on the end of the stencil, then peel & roll the rest of the tape over the stencil. Peeling all the tape off and then applying it to the stencil makes for lots of wrinkles.
6. Flip the stencil over and use your scraper tool to adhere the vinyl to the transfer tape.
7. Peel the transfer tape backing off. I use my hook tool to help press down any vinyl that didn't stick.
8. Keep that shiny backing piece. You'll use it later!
 9. Apply the stencil to your fabric. Carefully remove the transfer tape. Press over your stencil to make sure there are no bubbles.
10. Insert the shiny backing from the transfer tape you saved in Step 8 inside the nightgown. This will keep any fabric paint from bleeding through to the other side. What's nice about using this backing is that it doesn't stick to the dried paint!
11. Use your fabric paint to paint over the stencil. This is the fun part! Let dry for several hours {I usually leave mine overnight}. Peel away stencil and view your beautiful, delicious, scrumdiddlyumptious Wonka Bar!!


 As you can see, this is fun for a family Halloween costume set, but I think it would be cute for a Wonka themed birthday party! Which, knowing that certain spouse of mine, I could see being requested in the future.


xo

Here's more spooky inspiration for you {the coolest person ever!}:


Wednesday, August 21, 2013

One Frame --> 2 Ways!

If I said:

"Give me one Dr Pepper and I'll give you back a Dr Pepper and a bag of peanut butter M&M's,"

You would say:

"Heck yes!"

Right?

Of course.

So this tutorial is basically like that.


If you love Ikea, raise your hand. *raises hand*
I love their picture frames -- especially this beaded one.  Following this tutorial, you can get TWO cute display pieces out of just ONE frame, using the frame itself and the frame back w/ stand piece.

FRAME with BANNER

For this project, I took everything out of the frame and just used the frame itself.  I used Silhouette Studio to create the pennants for my banner. The background of each letter is pink toile -- which matches the curtains in the nursery. The awesome thing about using a Silhouette cutting tool is that it cuts the holes for you for hanging with ribbon or twine or whatever you choose! I used bakers twine. Then, I just taped it to the back of the picture frame. You can't see the back, so no one will see your tape. :) Voila! Project Uno.


FRAME INSERT w/ STAND AS PICTURE HOLDER
 This has to be one of the easiest projects I've ever done, and it is one of my faves! It is so simple -- which is my favorite thing about it. All you need to do is take the back piece of the frame (that has the stand attached to it) and hot glue a piece of burlap over the front. I cut my piece a couple inches wider than the frame insert, so I could wrap it around and hot glue it to the back. Again, the back doesn't have to be perfect, because no one will see it! Then, I attached a bronze mini clip to the front burlap {again, with hot glue}. That's it! I love it, because I can switch out the photo any time I want. Voila! Project Number 2.


  Well, there you have it! A simple way to take ONE frame and make it into TWO adorable ways to display your favorite banner, saying, or photo. Mine are special pieces in Baby A's nursery. :) Have fun!


Wednesday, August 14, 2013

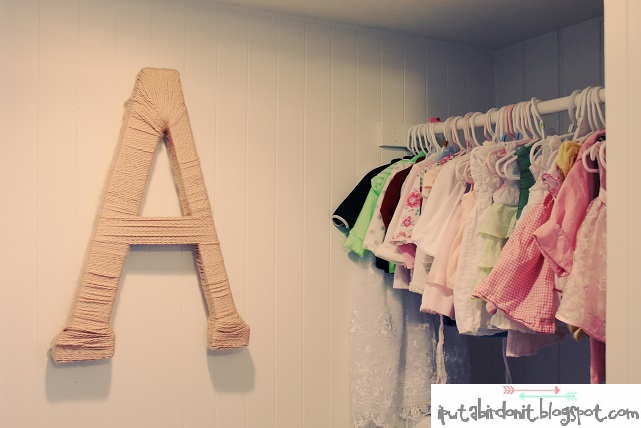
Baby A's Nursery {yarn wrapped letter}

I'm excited to share some projects I've done for Baby A's nursery! It will only take me until her first birthday to have her nursery FINISHED, but oh well! Slow and steady wins the race. The crafty little nursery race.


YARN WRAPPED LETTER


I've had this project in the works for a WHILE. You would think wrapping a letter in YARN would be super easy, but it kind of isn't. Well, it is WAY easy. It just takes time. And the following:
  • Giant letter {I got a paper mache one from JoAnns}
  • Yarn of your choosing
  • Glue gun & extra sticks
  • Scissor
  • Ginger Ale
  • Mike & Ike's
  • Roman Holiday
The last three are optional -- but definitely help pass the time!
I didn't take pictures of the process {bad blogger!}, but I did find an AWESOME tutorial by My Sister's Suitcase to link up to:
 
I'm having troubling deciding WHERE to hang this lovely lady in the nursery. 

Here are the options!!

IN THE CLOSET
 
BY THE WINDOW

 or

BY THE BOOKSHELVES

 What do you think???

Monday, July 22, 2013

DIY Hello Shirt {and Baby A version}

I like Facebook.

Don't we all?

I don't like Facebook ads.

Those annoying ads that stream on the right hand side of my timeline.

But the other day, the ads were actually useful.

I saw a shirt that I kind of knew I needed to own.

It looked like this:

And it belongs to Hello Apparel.

It also costs $28. Plus shipping.

Which is basically a giant NO.

But oh how I wanted the shirt to be a giant YES.

So, what did I do?

I Put a Bird on It.

And I made it myself.

With my Silhouette Cameo and some fabric paint.

I used a shirt I already had.

So the project cost me NOTHING. click me

If the Hello Apparel people come after me, because I copied their shirt, that'd be pretty darn cool.

Because that means I'm cool enough for the Hello Apparel people to come after me, because I copied their shirt.
Although it looks like a "period" the punctuation is in fact a HEART.

And I couldn't resist making a pint size variation for Baby A.

And then you can take the $30+ you saved and go to Buffalo Wild Wings. Twice.

Click below for links to download files to make your own Hello shirt
 {{so you too can look really, really ridiculously good looking}}


{{For a tutorial on making your own and using fabric paint with your stencil, click the link below}}


If you make a shirt inspired by me, please comment and link it up. I'd love to see!


Blog Design By Brand Me Beautiful