Hi everyone! Sorry I've been a little MIA lately...we are still living at my dad's and YEP my craft box is STILL packed up. :( BUT - I'll try really hard to make it up to you with lots of fun crafts when I get my own house with my own craft room (hopefully!). We put in an offer on a home today, but the house is already under contract, so we are just a backup offer. We probably won't get it, so we are continuing to look...hoping we find that one special home soon!
Today, I've got a Silhouette tutorial for you. I originally guest posted this on Get Silvered and am excited to share it with you guys now! For those of you who don't know, I own the Silhouette Cameo and L-O-V-E it. I use it for almost every craft I make. One in particular is the Maternity Countdown Shirt that I sell {SHOP}. I make each shirt by hand and would cut out a stencil for the numbers each and every time. It was kind of time consuming and used up a lot of vinyl per shirt. Just a couple months ago, I found out that Silhouette sells a -- you ready for this? -- REUSABLE STENCIL MATERIAL!!!!!! I pretty much freaked out and immediately bought some to try out. Well, it's AMAZING! It's basically a thin plastic that I use over and over and over again. I make so many shirts with one stencil - it saves me SO much time and money. This post is all about my review and a tutorial for cutting and using it!
The Stencil Material comes in a tube. This is great for storing, but not totally great for the stencil material itself. Mine had a few bubbles (you can see in pic below) which made me think at first that the cutting part did not cut all the way through. I was happy to see when I unloaded it that it did cut perfectly - I just had to pull the stencil off the paper backing carefully to make sure it came off along the cut lines in a couple of places. {addition: since I wrote this review, I've purchased more stencil material, and it didn't bubble. Maybe it was just my first try...!}
Search This Blog
Showing posts with label fabric paint. Show all posts
Wednesday, May 28, 2014
Saturday, April 26, 2014
Contributor Post at Pretty Providence - April |
Today is very exciting, friends. Today is my very first contributor post - ever! Not just a guest post, but an actual C-O-N-T-R-I-B-U-T-O-R post, which means I'm a recurring lady on someone else's blog. I'm REALLY excited and kind of nervous at the same time. The blog is Pretty Providence.
I've followed Jessica and Sarah's blog for a while now, and really love it. Their style and tastes are super similar to mine. I've thought about being a contributor on another blog before, and have even been asked to be one, but I've never felt like the timing was right or found that one special blog that really fit ME and MY style. Pretty Providence does that to a 'T' - so when I read they were calling for contributors, I didn't even hesitate to apply. Jessica and Sarah were amazingly nice enough to love my blog and really want me to be a contributor! I'm just so excited to share my love of simple & easy crafts with others. I'll be posting once a month over there as a Fashion DIY contributor, and I'll give you all a reminder the day I do, so you can check out what I have to share!
Today, I am sharing a cheap & easy tutorial for making your own Anchor Tee. I just LOVE mine and wore it to SNAP! {a blog conference here in Salt Lake City}. I even got complimented on it from a huge blogger that I totally {heart}, so it kind of made my day. I hope you'll visit Pretty Providence and check out my first contributor post {there may even be a FREE PRINTABLE for you!}. Have the best day!
I've followed Jessica and Sarah's blog for a while now, and really love it. Their style and tastes are super similar to mine. I've thought about being a contributor on another blog before, and have even been asked to be one, but I've never felt like the timing was right or found that one special blog that really fit ME and MY style. Pretty Providence does that to a 'T' - so when I read they were calling for contributors, I didn't even hesitate to apply. Jessica and Sarah were amazingly nice enough to love my blog and really want me to be a contributor! I'm just so excited to share my love of simple & easy crafts with others. I'll be posting once a month over there as a Fashion DIY contributor, and I'll give you all a reminder the day I do, so you can check out what I have to share!
Today, I am sharing a cheap & easy tutorial for making your own Anchor Tee. I just LOVE mine and wore it to SNAP! {a blog conference here in Salt Lake City}. I even got complimented on it from a huge blogger that I totally {heart}, so it kind of made my day. I hope you'll visit Pretty Providence and check out my first contributor post {there may even be a FREE PRINTABLE for you!}. Have the best day!
DIY Anchor Tee at Pretty Providence
xo
I hope you'll stop by my link party and link up at Link'n Blogs before you go! Click > HERE <
Also, you can enter to win Ad Space for your blog on MY blog for the month of May!
Labels:
contributor post,
DIY,
fabric paint,
fashion
Monday, March 24, 2014
DIY Polka Dot Pants |
We've all seen them. An adorby pair of polka dot pants in your fave store just hanging there saying "Buy Me" - "Buy Me". The other part we also see? The price tag. OUCH! Keeping up with the latest trends can get pricey pricey these days. BUT. Thankfully. There is a way to get your polka on (literally) without breaking the bank. Three little letters: D-I-Y. It doesn't get much simpler than polka dot pants. You only need 3 ingredients: pants, fabric paint & foam pouncer. Read on, my friends. Read on.
I went to Deseret Industries ("D.I." - as we call it - a LDS thrift store) and bought a pair of used skinny jeans for $3. One time through the wash and they are good as new.
You can buy fabric paint, or make your own. I always opt for making my own. SO cheap and easy to make just a little for your current project. Buy a fabric medium and mix 2 parts paint with 1 part medium. I use a couple cupcake liners stacked to mix my paint. That way, I can toss it when I'm done.
Labels:
DIY,
fabric paint,
fashion,
polka dots
Tuesday, February 11, 2014
DIY Glitter & Gold Heart Sleeves made with Homemade Fabric Paint ... And A Silhouette Studio Tutorial |
This project was SO EASY, I can't stress the EASY factor enough here. I made it in about 20 minutes the night before Build Your Blog Conference, because I wanted to wear this cute cardigan to the conference. I definitely wore my heart on my sleeve that day. :)
Here's what you'll need to make your own cute heart-on-my-sleeve shirt:
The Goods
Shirt {I used a cute cardi I got on sale at Target}
Heart Stencil {I cut mine out of vinyl using my Silhouette Cameo}
Fabric Paint {2 parts acrylic paint + 1 part fabric medium}
Foam Brush
Here is the tutorial for making a stencil using a Silhouette Cameo. I just LOVE my Cameo, guys. I use it almost every day. It's rare for me to make a project without using it in some way. I thought it'd be helpful to show how to make a heart stencil out of vinyl using the Cameo and designing it in Silhouette Studio. If you don't have a Cameo {yet!}, you can skip this part and go to the next part about painting on your shirt. You can make a stencil out of freezer paper or buy a heart stencil from the store. After seeing how easy it is with a Cameo, though, you might be headed out to get one for yourself.
*I know it seems like a lot of photos, but I swear it is SO easy. Don't let the photos scare you - I just like taking photos, ok?! ;)
Labels:
clothing,
DIY,
fabric paint,
fashion,
gold,
hearts,
Silhouette Cameo,
Silhouette Tutorial
Tuesday, February 4, 2014
DIY Monogram Business Card Holder ... Guest Post by Stephanie of Newly Mynted |
Hello Bird readers!
What a joy to be trading spaces with Daniela today. When you're done here, head over to NewlyMynted to see what she's got for you. It's like Two for the Price of One awesomeness!
With Valentines Day just around the corner, many of us are trying to decide what to get our significant others. For me, this is a real challenge. My honey, Logan, is a computer technician, so getting him anything related to computers is out of the question. I know how to use mine, but don't ask me about the mechanics behind it. He does, however, love it when I make him things! And if there's one thing men certainly appreciate, it's a practical gift. With that, it became a question of what gift DIY gift for men could I create? Recently Logan was promoted to management and received business cards with his name on them. Yeah, I'm a little proud of him!
Supplies:
Leather or other fabric
Pelon fusible interfacing
Sewing machine
Sizzix Big Shot & embossing folder (optional)
Computer
Xacto knife
Martha Stewart acrylic paints: Wedding Cake and Gold
Sponge brush
Fine tip paintbrush
Cut your main fabric and interfacing as follows:
Main 4" x 4 3/4"
Pockets (x2) 4" x 2 1/4"
NOTE: FITS STANDARD 3.5" X 2" SIZE BUSINESS CARDS
Trim your interfacing down 1/4" on all pieces and iron onto the back of each of piece of fabric. You can ignore my coffee stains. Being an avid DIY'er and coffee drinker has its set backs.
This is where things get exciting. Logan got me this pretty little number for Christmas, and imagine my surprise when I found out you can emboss fabric. You heard me right, You Can Emboss Fabric! Yes I squealed! To keep this masculine, I went with a simple quarter foil embossing folder I picked up at Michael's. Run it through according to your machine's directions, and revel in the sheer awesomeness of this discovery. Is that not one of the neatest things you've done in all your crafty days?!
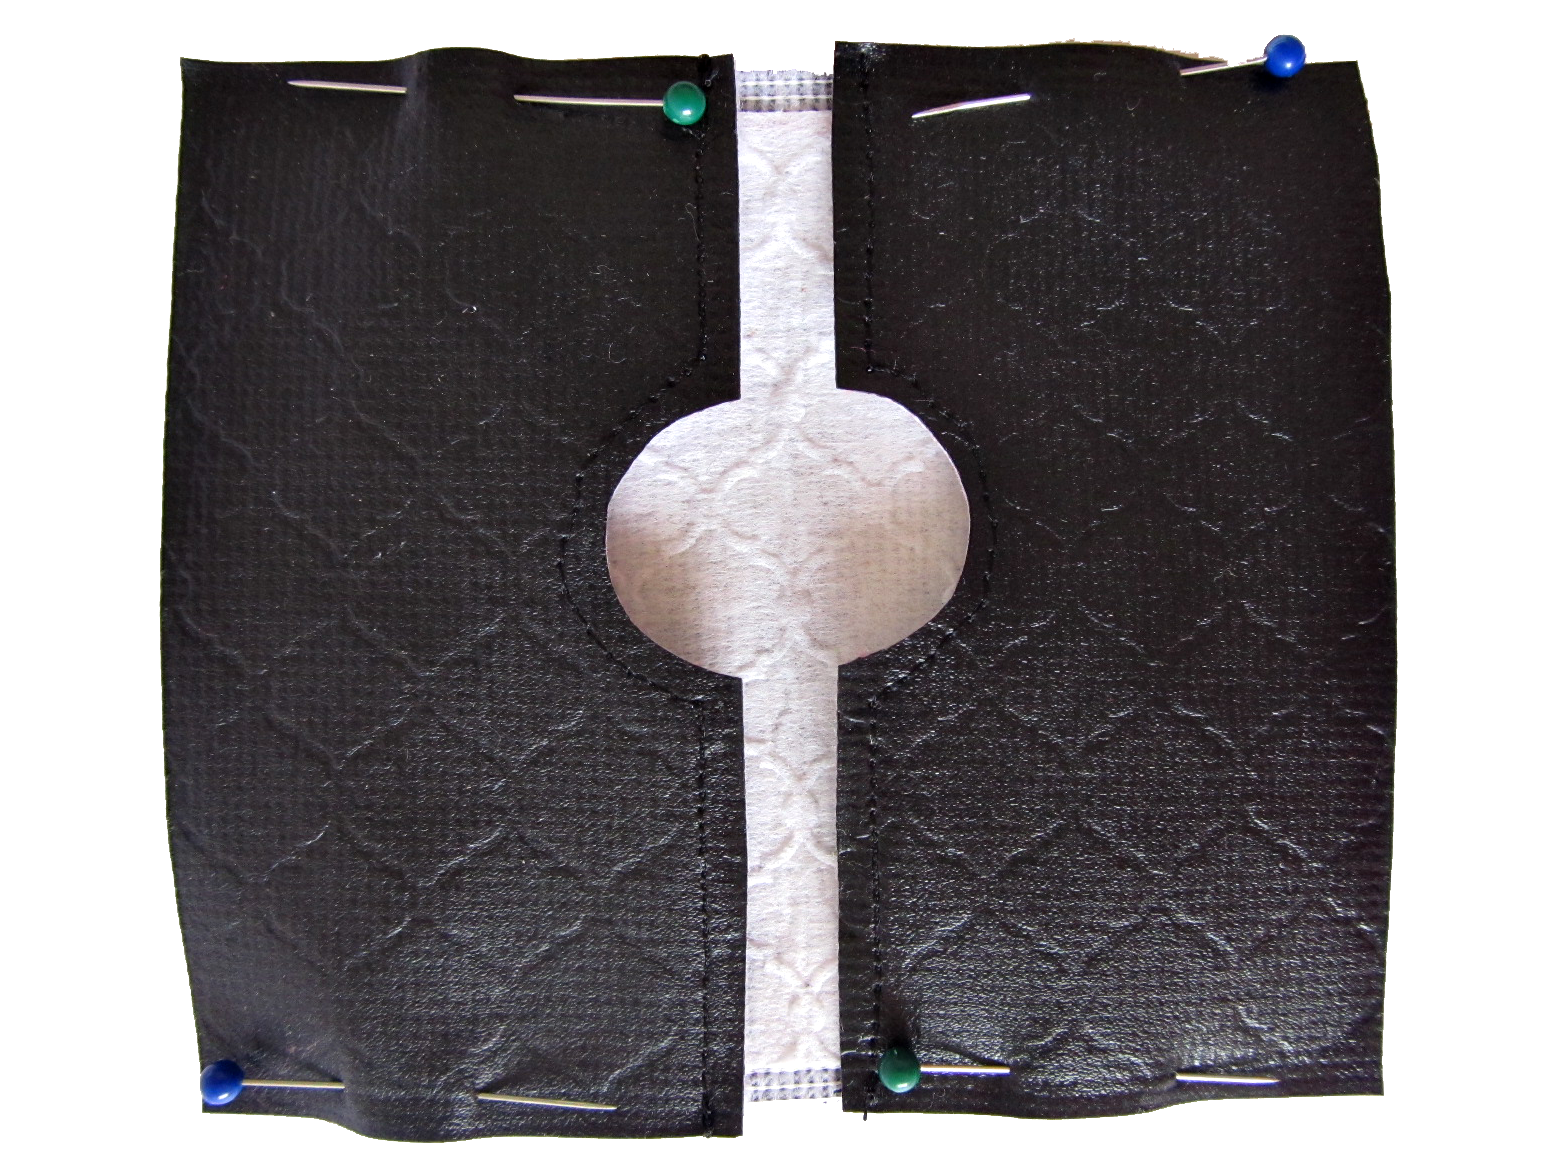
Using a quarter (or other small round object), trace a half circle and cut it out of each of your pockets. This will create a little thumb hole to make it easy to pull a card out. My advice, though, be smart and measure the center of your pockets. I did it the lazy way and eyeballed it, and my cut-outs didn't come out centered. Oh well. There is no room for perfection in creativity, am I right?
With a long straight stitch, sew across the top of each pocket first with a 1/4" seam. Since this is a leather fabric that won't fray I left my seams exposed.
Pin the pockets to the main fabric wrong sides together and sew around all four sides, also with a 1/4" seam.
Open a Word document and select what monogram font you want. I used Go to the Sky, but here is a great selection of many more. Make sure your document's zoom is set at 100% so you can get an exact size of what it will look like when you print it out. Mine was 1 1/4". Once it's printed, use your Xacto knife and cut away the negative space.
Tape the stencil you just made to the front of the card holder and paint. Be sure to dab only in up and down motions. If you turn your sponge to the side, paint will get shoved underneath and your lines will become uneven. Two coats is best, but if you're like me and lack the patience to wait an hour between coats, break out your hair dryer. It's a multipurpose tool!
With your fine tip paintbrush, line your letters in white and dry again. And that's all. In an hour you now have a custom Valentine's gift for him. I can't wait for the 14th to come around to give him this. Last year I made him a leather Bible cover and he adores it. It brings him so much joy to show off the things I take the time to make for him.
Thanks for having me, Daniela! I would love to hear from each of you:
*********************************
Ok - are you as impressed with Stephanie's tutorial as I am? Who wouldn't enjoy receiving that gift? I hope my husband doesn't read this -- he will be super jealous, ha ha. Thanks to Stephanie for visiting! Like she mentioned earlier, I am over at Newly Mynted sharing a tutorial for DIY Coasters, but not the typical photo or tile kinds. Be sure to head over there {click here!} to see what I used to make my hand painted ones {spoiler alert: it might include a lot of burlap!}.
xo
Enter the fab giveaways I'm currently hosting!
You can follow my Pinterest boards here:
Labels:
DIY,
embossing,
fabric paint,
For Him,
gift ideas,
guest post,
sewing
Monday, November 18, 2013
Burlap & Polka Dots Quote Display *GIVEAWAY* |
Happy Monday!
Today, I am excited to share my easiest craft ever.
But you can't find it here!
Nope. I am GUEST POSTING on Best Day Ever!
Head on over for a full tutorial and chance to WIN one of these cute quote displays with a 12-pack set of my favorite quotes.
Happy Monday!
Today, I am excited to share my easiest craft ever.
But you can't find it here!
Nope. I am GUEST POSTING on Best Day Ever!
Head on over for a full tutorial and chance to WIN one of these cute quote displays with a 12-pack set of my favorite quotes.
Happy Monday!
![]() |
| Printables by A Step in the Journey and Simply Kierste |
Love the quote I'm displaying from President Monson? Click the link below to download for FREE!
Free Printable - President Monson Quote
Labels:
burlap,
Christmas,
fabric paint,
fall,
gift ideas,
GIVEAWAYS,
LDS,
no sew,
polka dots,
printables,
super easy
Tuesday, November 5, 2013
DIY Baby Wonka Bar Costume |
It all started when a certain spouse of mine decided Ava should be a WONKA bar for Halloween. *sigh* He might have a slight obsession with the Willy Wonka movie -- the old one -- not the Johnny Depp version. Well, you can't just go out and BUY a baby wonka bar costume. They don't exist. Even if you could, I wouldn't, because Halloween costumes cost one gajillion dollars. So I knew I had to get my craft on if I was going to make my husband's Halloween dream come true. And it really wasn't even that hard. I can't sew. Nope! I even have my grandmother's sewing machine, but I've never learned. That's definitely on my TO DO list. But, until then, it's a no-sew life for me. I decided to use fabric dye and fabric paint to make Ava's wonka bar costume. Like I said earlier - it wasn't even that hard. YES - I did fail the first time I tried fabric dye. And YES - I thought about giving up. And YES - I did eat almost 100 mike & ike's out of frustration. But it all worked out in the end.
SO.
To check out how to dye your fabric brown, click HERE for my Fabric Dye Tutorial.
In order to do this, you will need my Wonka Bar Costume stencil. You can find it {along with my other Free Printables & Stencils} by clicking on the links below:
Now, don't you feel super special knowing you are one of the ONLY people on the planet to have a Wonka bar baby costume stencil??!!!! Welcome to the cool kids club.
I'm definitely a visual learner, so the rest of the tutorial will be through pictures. Have fun! And remember -- candy is dandy, but liquor is quicker.
**Note: I used fabric paint, because I'm kind of obsessed with it, but you could use heat transfer material, too. Just cut out the different shapes and letters in the colors you want. That would work quite splendidly!**
As you can see, this is fun for a family Halloween costume set, but I think it would be cute for a Wonka themed birthday party! Which, knowing that certain spouse of mine, I could see being requested in the future.
SO.
To check out how to dye your fabric brown, click HERE for my Fabric Dye Tutorial.
In order to do this, you will need my Wonka Bar Costume stencil. You can find it {along with my other Free Printables & Stencils} by clicking on the links below:
Now, don't you feel super special knowing you are one of the ONLY people on the planet to have a Wonka bar baby costume stencil??!!!! Welcome to the cool kids club.
I'm definitely a visual learner, so the rest of the tutorial will be through pictures. Have fun! And remember -- candy is dandy, but liquor is quicker.
**Note: I used fabric paint, because I'm kind of obsessed with it, but you could use heat transfer material, too. Just cut out the different shapes and letters in the colors you want. That would work quite splendidly!**
Pull up the stencil file in Silhouette Studio. You'll have to change the settings to looks like these. The main ones to note are: change the width to 9 and the height to 15 and change the cutting mat to NONE. These are the settings I used for a 6-12mths size baby nightgown. You can adjust to whatever size you need.
![]() |
| **Hover over top left of photo to PIN!** |
1. Load your vinyl in your Cameo or Portrait. I used 9" vinyl, but you can use 12" as well.
2.
In Silhouette Studio, send the file to the Cameo to cut. Once you
choose the Vinyl as the item you're cutting, the rest of the settings
change for you. Remember to make sure you have your blade in your Cameo
set to what setting it shows on your computer screen. Once it's all set,
press CUT! Sit back, and watch the magic.
3. Cut off your vinyl stencil!
4. Using your hook tool for assistance, peel away the letters and border, so you have the negative space left.
**here's
a tip. if you don't have a hook tool {yet!}, i've used a fondue fork or
even scissors to help peel away the vinyl. but the hook tool works the
best!**
5. Apply the transfer tape to the front
of your stencil. I peel a small portion off and press it on the end of
the stencil, then peel & roll the rest of the tape over the stencil.
Peeling all the tape off and then applying it to the stencil makes for
lots of wrinkles.
6. Flip the stencil over and use your scraper tool to adhere the vinyl to the transfer tape.
7. Peel the transfer tape backing off. I use my hook tool to help press down any vinyl that didn't stick.
8. Keep that shiny backing piece. You'll use it later!
9. Apply the stencil to your fabric. Carefully remove the transfer
tape. Press over your stencil to make sure there are no bubbles.
10.
Insert the shiny backing from the transfer tape you saved in Step 8
inside the nightgown. This will keep any fabric paint from bleeding
through to the other side. What's nice about using this backing is that
it doesn't stick to the dried paint!
11. Use your fabric paint to paint over the stencil. This is the fun part! Let dry for several hours {I usually leave mine overnight}. Peel away stencil and view your beautiful, delicious, scrumdiddlyumptious Wonka Bar!!
As you can see, this is fun for a family Halloween costume set, but I think it would be cute for a Wonka themed birthday party! Which, knowing that certain spouse of mine, I could see being requested in the future.
xo
Here's more spooky inspiration for you {the coolest person ever!}:
Labels:
Baby,
clothing,
fabric dye,
fabric paint,
Halloween,
heat transfer,
no sew,
party ideas,
Silhouette Cameo,
Willy Wonka
Friday, August 16, 2013
KEEP CALM and TAG ON {glow in the dark shirt & printable} |
Sweaty palms.
Neon.
Ducking.
Spinning.
Plotting.
Aiming.
Shooting.
Tom Cruise.
Ok, that last one isn't a part of it. But the rest is describing a wicked awesome night playing laser tag. I can be a 24-year old mother of 1 and still LOVE laser tag right?? Two weeks ago was girls night in my family, and these ladies didn't pick shopping -- or a pedicure -- or drooling over the latest Channing Tatum movie {which I wouldn't do; did anyone else think he put on a few L-B's in the new G.I. Joe??!} -- these ladies chose LASER TAG. Unfortunately, my only part in the evening was showing up in this really, really ridiculously good looking GLOW IN THE DARK LASER TAG SHIRT,because this was the night my poor sweet husband slipped down the stairs while holding our poor sweet baby and she broke her poor sweet leg! So I was whisked away to spend the night in the ER. But I'll always have this picture of me looking the part.
Come on. You KNOW how badly you want a glow in the dark KEEP CALM and TAG ON shirt. And you can have one! All you need are the following:
- T Shirt {I used a black 3/4 sleeve tee I had in my closet that hadn't been worn in awhile}
- Glow In the Dark Heat Transfer Material {I used white and bought mine for a steal from Pick Your Plum}
- Iron
I'm sharing the Silhouette Studio file for my design!! Click the link below
If you don't have a Silhouette cutting machine {and you should!}, then here is a file to print a stencil to use with fabric paint & freezer paper. You can still make a fab T shirt!
I also have two FREE PRINTABLES if you just want the image! This would be fab to use for a laser tag birthday party, your Awesome Quotes board on Pinterest, or even framed and put next to your bed on your nightstand, so you can dream about your next great laser tagging adventure.
**If you make anything inspired by one of my projects, LINK IT UP! I'd love to see and SHARE!**
Monday, July 22, 2013
DIY Hello Shirt {and Baby A version} |
I like Facebook.
Don't we all?
I don't like Facebook ads.
Those annoying ads that stream on the right hand side of my timeline.
But the other day, the ads were actually useful.
I saw a shirt that I kind of knew I needed to own.
It looked like this:
And it belongs to Hello Apparel.
It also costs $28. Plus shipping.
Which is basically a giant NO.
But oh how I wanted the shirt to be a giant YES.
So, what did I do?
I Put a Bird on It.
And I made it myself.
With my Silhouette Cameo and some fabric paint.
I used a shirt I already had.
So the project cost me NOTHING. click me
If the Hello Apparel people come after me, because I copied their shirt, that'd be pretty darn cool.
Because that means I'm cool enough for the Hello Apparel people to come after me, because I copied their shirt.
And I couldn't resist making a pint size variation for Baby A.
And then you can take the $30+ you saved and go to Buffalo Wild Wings. Twice.
Don't we all?
I don't like Facebook ads.
Those annoying ads that stream on the right hand side of my timeline.
But the other day, the ads were actually useful.
I saw a shirt that I kind of knew I needed to own.
It looked like this:
And it belongs to Hello Apparel.
It also costs $28. Plus shipping.
Which is basically a giant NO.
But oh how I wanted the shirt to be a giant YES.
So, what did I do?
I Put a Bird on It.
And I made it myself.
With my Silhouette Cameo and some fabric paint.
I used a shirt I already had.
So the project cost me NOTHING. click me
If the Hello Apparel people come after me, because I copied their shirt, that'd be pretty darn cool.
Because that means I'm cool enough for the Hello Apparel people to come after me, because I copied their shirt.
![]() |
| Although it looks like a "period" the punctuation is in fact a HEART. |
And I couldn't resist making a pint size variation for Baby A.
Click below for links to download files to make your own Hello shirt
{{so you too can look really, really ridiculously good looking}}
{{For a tutorial on making your own and using fabric paint with your stencil, click the link below}}
If you make a shirt inspired by me, please comment and link it up. I'd love to see!
Labels:
Baby,
clothing,
fabric paint,
gift ideas,
no sew,
Silhouette Cameo,
super easy
Thursday, October 11, 2012
Maternity Countdown Shirt {& fabric paint tutorial!} |
**BUY A MATERNITY COUNTDOWN SHIRT HERE!**
Being pregnant is an AMAZING experience. One I never want to forget. Thankfully, my sister has been willing to take fun mini photo sessions to document my pregnancy. One of my faves was at 18 weeks. I made a Maternity Countdown Shirt to show which week of pregnancy I was at. This was a FUN project to make, but I was nervous. This was my first time making my own fabric paint. Turns out, it's a lot cheaper than buying premade fabric paint. And, it's really easy!!
***Not up for making your own shirt? You can visit my online shop and BUY a countdown maternity shirt! Click the link below:
http://putabirdonitshop.storenvy.com/
What You'll Need:
- Tintable Fabric Medium {I love Martha Stewart products}
- Acrylic Paint in color(s) of your choice
- Empty bottle {Perfect for mixing and saving fabric paint}
- Foam brush x2
- Vinyl stencil for numbers
- Shirt {get one that fits now but has some stretch to fit the full 40 weeks}
Now, place your stencil on your shirt. I used my Silhouette SD to cut out the stencil using Silhouette premium vinyl. It is SO easy, and I'm guaranteed straight lines...I wouldn't trust myself otherwise. I had to cut 2 stencils, 1-20 on one and 21-40 on the other. Remember to leave enough empty space around the cut out on the stencil to allow you to paint and not get paint on the shirt! I recommend putting something inside your shirt, to protect the paint from leaking onto the back of the shirt. I've used an old piece of cardboard or a couple layers of newspaper ads works great, too.
Once you have the stencil in place, simply paint over the stencil, using a foam brush, with your fabric paint. I painted over the whole thing once, then went back and put a second coat {lighter} just to make sure it was all covered. This needs to dry for a while. I usually do mine in the evening and let it dry overnight. Tip: After several minutes of drying time, put your hand under the stencil and 'lift' up a little to make sure the paint isn't adhering to the cardboard/ads you put underneath.
Once it is dry, peel away the stencil, and CONGRATS! You've made a shirt covered in numbers! Now, to give it meaning, use the 2nd color of fabric paint to CROSS OFF the weeks. You could cut out more stencils, if you want a perfect line. I just grabbed a foam brush and applied the paint without a stencil. Let this dry again. This part doesn't take as long to dry. Once it's dry, you are FINISHED! Hold on to that fabric paint, since you'll need to cross off more weeks as your pregnancy goes on. Super fun way to document your growing belly, huh?!
Got a maternity countdown shirt or a fabric paint project you love? Share the link in the comments. I'd love to see it!!
***Not up for making your own shirt? You can visit my online shop and BUY a countdown maternity shirt! Click the link below:
http://putabirdonitshop.storenvy.com/
~~~~~~~~~~~~~*~~~~~~~~~~~~~~~~~~~*~~~~~~~~~~~~~~~~~~~~~~*~~~~~~~~~~~
Here are updated pictures of this fantastic maternity shirt! It is SO easy to dab a little more fabric paint to cross off one more week in the countdown. Love it!!
***Not up for making your own shirt? You can visit my online shop and BUY a countdown maternity shirt! Click the link below:
http://putabirdonitshop.storenvy.com/
Be sure to click "Join this Site" on the right side toolbar to stay up to date on all things Put A Bird On It. That way, you'll be notified the next time I give away a maternity countdown shirt! Which I've been known to do. :)
*****************************************
You might also like
Check out Pick Your Plum for today's daily deals!
Labels:
clothing,
fabric paint,
maternity,
Silhouette SD
Subscribe to:
Posts (Atom)