photo PABOI2.jpg

Weekly Digest

 photo PAGEShome1.jpg  photo PAGESlinkparty1.jpg  photo PAGESfeatured1.jpg  photo PAGESsponsor1.jpg  photo PAGESguestposts1.jpg

Search This Blog

Showing posts with label Halloween. Show all posts

Monday, October 13, 2014

Burlap & BOO Halloween Wreath

Close your eyes. Just for a moment. Take a deep breath. And ask yourself:

"What's hanging on my front door right now?!"

It's usually crickets in my head after I ask this question. I'm not awesome at updating my front door wreath...But not this month! I've seen so many pretty FALL wreaths on front doors in my neighborhood - I wanted IN on the festive fun. I whipped out my Burlap Wreath {easiest wreath EVER! and super easy to switch up for different holidays - >here's my POST< on that baby} and made it into a Burlap & BOO Halloween Wreath.


I used my burlap wreath (which is adorable just on its own) and made a second wreath to go in the middle. I thought it added unique dimension to the usual holiday wreath. The inner wreath is a foam wreath form wrapped in my favorite black & white polka dot fabric (hot glued into place). Then, I used a mustard yellow wired twine to wrap it around the burlap wreath and hang my BOO banner. Mustard yellow is a MUST for this fall {see more mustard yellow inspiration HERE}.

The BOO banner was inspired by A Beautiful Mess and their BOO Banner. Adorable, right? Their tutorial is pretty simple, but I simplified it even MORE by making a mini version - skipping the sewing {cause y'all know girl can't sew} - and used my Silhouette Cameo to cut it out of fabric. If it was any easier - a cave man could do it. And they should. Cause you can't tell me their caves couldn't use a Burlap & BOO Halloween Wreath.

This month, I'm taking part in a Silhouette Challenge, along with the bloggers of "The Silhouette Challenge" group on Facebook. If you have a Silhouette, you should totally join this group! This is the first monthly challenge I'm part of, but I enjoy being part of the group every day. Ask questions - show off your projects - learn about Silhouette promos - and get mad inspired. For this challenge, I'm going to share the tutorial for making your own Mini BOO Banner with a Silhouette cutting machine! I used the Cameo, but you can totally use a Portrait. In fact - I used the Portrait cutting mat in my Cameo for this very banner. {remember - so easy - the cavemen - cool}

How to Make a Mini BOO Banner with your Silhouette Cutting Machine

Supplies
  • Black fabric {I bought 1/4 yard of broadcloth and had TONS left over}
  • No-sew fabric interfacing {I bought Heat 'n Bond, but Silhouette sells a great one, too}
  • Iron & Ironing board
  • Very thin wooden dowel {29cents at Hobby Lobby}
  • Black yarn | twine | pipe cleaner
  • Scissors
  • Glue gun
  • Silhouette Cameo or Portrait
  • Silhouette cutting mat
**I have an awesome, FULL tutorial with photos for how to cut fabric with your Silhouette machine. You can view it by clicking > HERE < -- it is very detailed, so I'll just give the brief version here.**

Step 1 || Prep fabric for cutting
  • Cut fabric to size and iron interfacing to fabric.
  • Remove back of interfacing and cut down to size to fit on cutting mat. *I used the Portrait mat in the Cameo*

  • Place fabric on cutting mat. Load into Silhouette machine. Send your "BOO Banner" design in Silhouette Studio to CUT {the fun part!}.
  • Peel off & discard excess fabric. Cut your wooden dowel down to size, leaving an inch or so on each side. Line up the dowel on the top back of your BOO banner, with enough fabric to wrap over the dowel to cover it. Place a line of hot glue along the dowel, wrap the fabric over and glue into place.
  • Admire your adorable BOO you made! 
  • Cut your twine or yarn to size {if you use a pipe cleaner, it's already the perfect size} and tie each end onto one end of the dowel. You're done! Congrats! You just made a mini BOO banner -- perfect for attaching to a halloween wreath.


Since you can never have enough inspiration {hello, that's what keeps Pinterest in business!}, here are the links to my Silhouette friends' posts -- all projects made with a Silhouette machine -- all having to do with this month's theme: FALL! I recommend pinning these projects, or at least this post, so you have all the links. Serious PINspiration going on here! Enjoy!


Paper Rosette Fall Wreath Hello Fall Sign Halloween Paper Bag Luminaries Spooky Mantle Ghost Town Dollar Store Placemat Jack O' Lantern Copper and Paper Embellished Pumpkins Ugly Sweater Wineglass Charms DIY Fall Leave Paper Wreath Starry Pumpkin Burlap & BOO Halloween Wreath Fall Paper Petals Fall Leaves Favor Tags 15 Minute Customized Halloween Buckets Gravestone Treat Bags with Free Cut File Beware of Zombies Halloween Shadow Box Welcome Sign Vampire Bat Specimen Boo-tiful Halloween Treats Little Turkey No Sew Thanksgiving Onesie Frozen Halloween Treats & Free Printable Fall Leaf Keychain Fall Lovin October Silhouette Challenge Punny #Hashtag Halloween Costume Still Falling For You Card DIY Etched Leaf Coasters
1. Create & Babble // 2. Lil Mrs. Tori // 3. unOriginal Mom // 4. Zanaree // 5. The Kim Six Fix // 6. One Dog Woof // 7. Cupcakes & Crowbars // 8. Living My Given Life // 9. Architecture of a Mom // 10. Put A Bird On It // 11. Just Add Paper // 12. Weekend Craft // 13. Silhouette School // 14. Minted Strawberry // 15. My Paper Craze // 16. McCall Manor // 17. Chicken Scratch NY // 18. Mama Sonshine // 19. Creative Ramblings // 20. From Wine to Whine // 21. Please Excuse My Craftermath... // 22. Dragonfly & Lily Pads // 23. The Thinking Closet // 24. Simply Kelly Designs // 25. Sandpaper & Glue //

xo


Here is more Silhouette inspiration from my blog! Grab some cider, put on your cardi, turn on some Hilary Duff and kick it here for a bit...




Friday, September 26, 2014

DIY Family Willy Wonka Costumes for Halloween

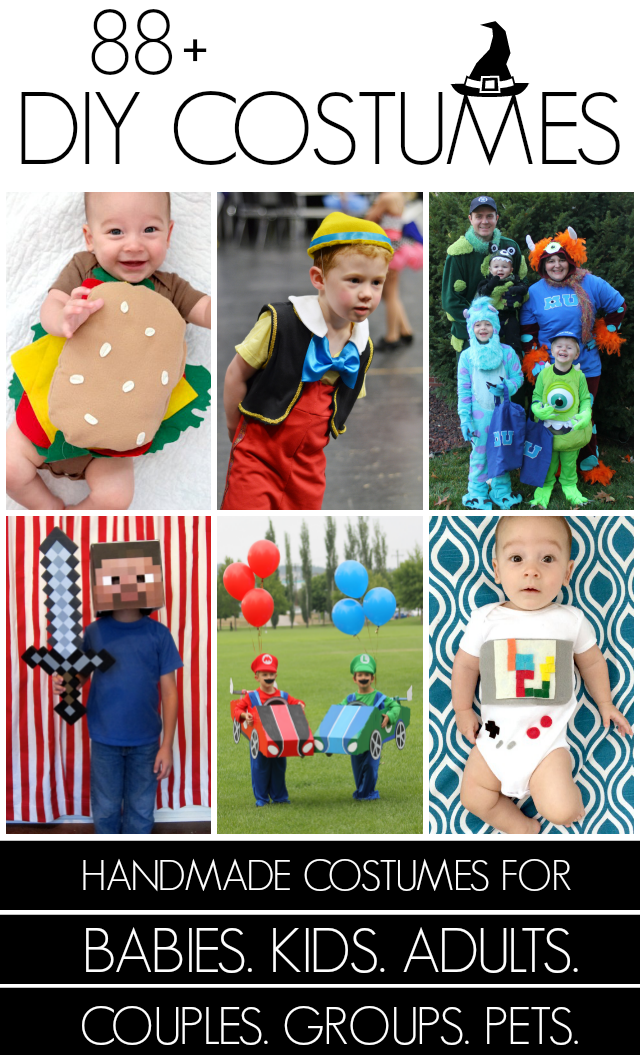
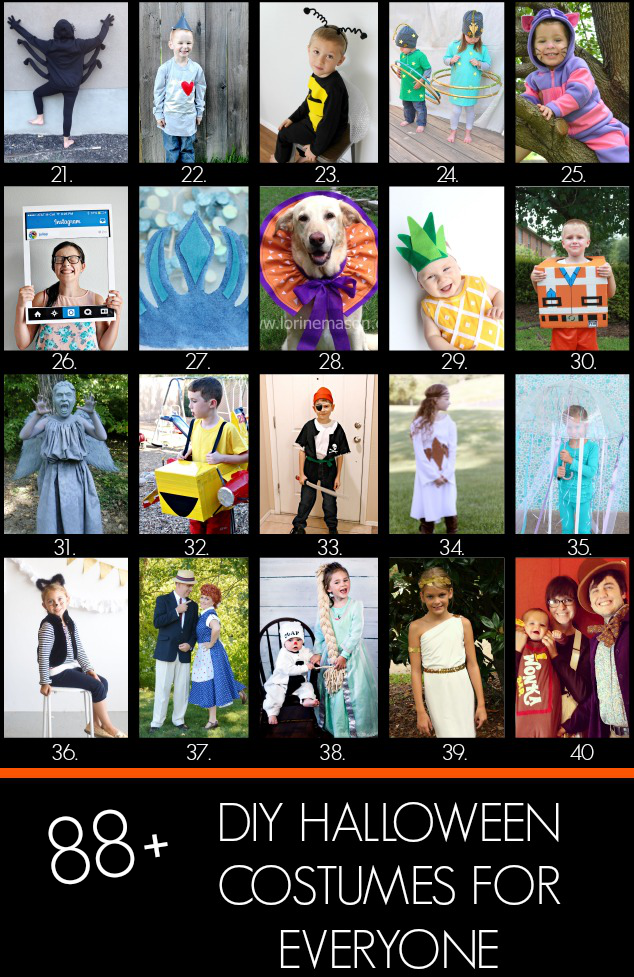
Hello everyone! I'm excited today to be part of a GINORMOUS Halloween costumes roundup! I'm getting my DIY on with Jamie Dorobek and her handmade Halloween costume site, Really Awesome Costumes, to share a one-stop-shop-of-ideas for DIY Halloween costumes for you, your family, your pets and even a Trunk or Treat idea! It's spooky good! This is THE PLACE to find your family's next Halloween costume idea for this year {and years to come!}. I highly recommend pinning this post to your Halloween Pinterest board - you'll definitely need it in the future!


101+ Handmade Halloween costumes at Creating Really Awesome Free Things


Last year, my family and I were all characters from the Willy Wonka movies. It was CHEAP and EASY! I even DIY'd a Baby Wonka Bar Costume for my little Ava. She was the CUTEST chocolate bar you'll ever see - I just wanted to munch those little wonka cheeks! I even tried RIT Dye for the first time! {see how to dye fabric with your washing machine HERE!}For the full tutorial on how to make your own Baby Wonka Bar Costume - click HERE! 


Here's how each costume breaks down:

DAD - "Willy Wonka"
  • Brown Top Hat
  • Flower Vest
    • I found a woman's denim flower shirt from a thrift store (Deseret Industries) - it totally worked as a "vest" {yes, it's a woman's shirt, but it doesn't look like it when Mr. Wonka is rockin' it!}
  • Purple Jacket
    • I gotta say - I totally lucked out on this one! I found a purple jacket {again - a woman's!} at a thrift store. It was a purple blazer and it worked perfectly! Just look around thrift stores and you are bound to find one that will work!
  • Bow Tie
    • My husband just used a regular brown tie of his and tied it in a bow. Perfect!
  • Cane
    • This is the crowning part of Mr. Wonka's costume. Ask a parent or grandparent if they have an old cane you can borrow. Chances are - they will say YES! And if your husband is anything like mine, he will get WAY too into playing the part once he has that cane in his hand. 
That's all you need to be Willy Wonka! Don't go out and spend a fortune on any of these costumes. You can seriously find almost everything at a local thrift store!

MOM - "Oompa Loompa"
  • Brown long-sleeved shirt
    • I had one at home, but thrift store-it up, if you don't!
  • White "puffy" pants
    • You can use white capris/pants, if you have them, or go thrifting! {are you seeing how most items are being thrifted??} I found some white baggy sweat pants that worked perfectly!
  • White suspenders
    • I bought a pair like this from Amazon {super cheap!}
  • Green hair
    • I was miss boring head and didn't color my hair green. Next time, I probably will! You can get an "oompa loompa" wig off Amazon for $15, or use green hair spray to color your hair. Even without the green hair, everyone knew what I was!
There you have it! Congrats! You're an oompa loompa now. I recommend learning the songs, so you can break into song and dance randomly {and whip out those killer midget dance moves you've been hiding!}.

BABY - "Wonka Bar"
  • Wonka Bar Outfit
    • Click HERE to view how I made my Wonka outfit for Ava! You could use a baby onesie, instead of the sleeper like I used, and paint the Wonka logo or use heat transfer. In my DIY tutorial, I dyed a sleeper brown and used my Silhouette Cameo to cut vinyl for a Wonka stencil, then used fabric paint to color it in. Check it out!

That's all there is to it! With just a little thrift store shopping and some scrumpdiddlyumptious imagining, your family can get Wonky with it this Halloween. I can't wait to see how YOU customize your Wonka costumes! Link back here - I'd love to see photos!

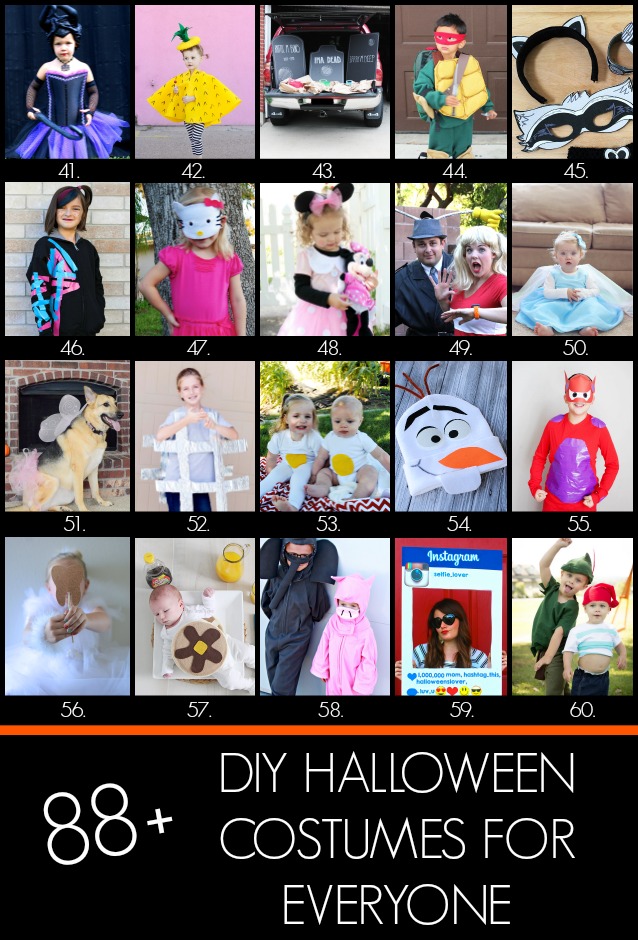
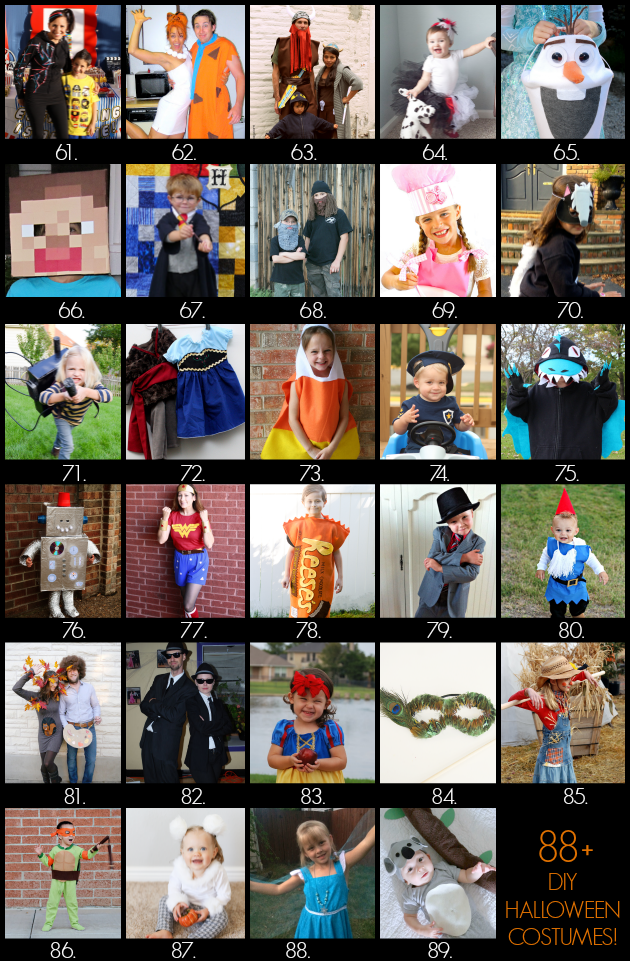
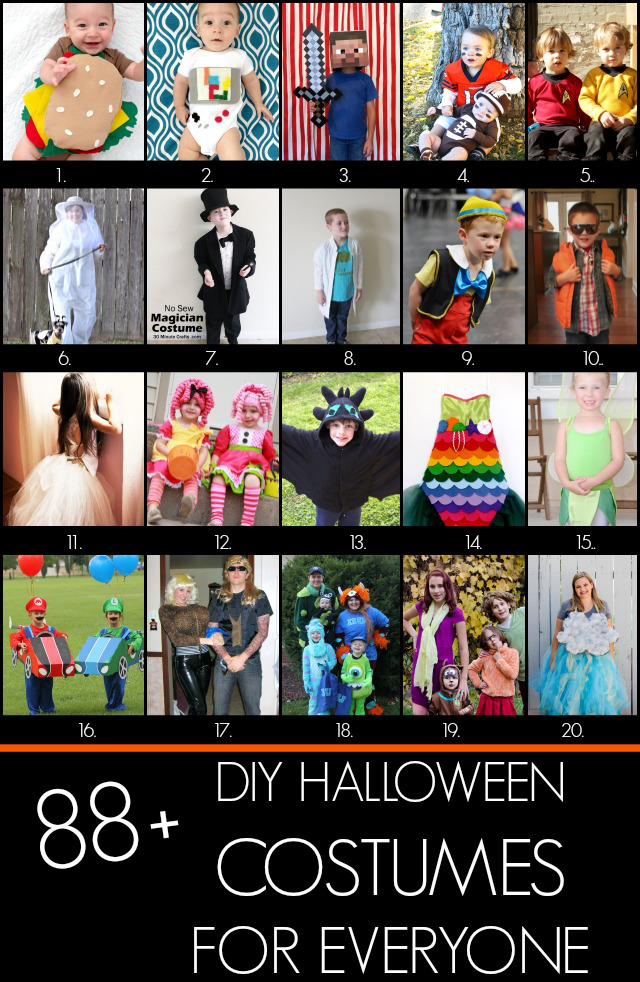
Now - get in on the 88+ action by clicking on the links below to see how my fellow bloggers DIY'd their own super creative Halloween costumes! Holy cow - I basically have to PIN them all! Be sure to follow the Handmade Halloween Costumes Pinterest Board for lots more Halloween inspiration.

88+ Handmade Halloween costumes at Creating Really Awesome Free Things

14. DIY Mermaid For Less Than $20 (No-Sew Option) 15. Easy Tinker Bell Costume 16. Mario and Luigi Go Kart Costumes 17. Dog The Bounty Hunter and Beth 18. Family Monsters University Costumes 19. Scooby Doo family costumes 20. DIY Storm Cloud Costume

  88+ Handmade Halloween costumes at Creating Really Awesome Free Things

21. Cheap and Easy DIY Spider Costume 22. Easy Tin Man Costume 23. No Sew Bee Costume 24. Planet Halloween Costumes 25. DIY Cheshire Cat Costume 26. DIY Instagram Board 27. Elsa crown 28. Dog Collar Ruffles 29. DIY Pineapple Baby Costume 30. DIY Lego Movie Costume 31. Weeping Angel Costume 32. Disney Planes Costume: Dipper 33. Easy Pirate Costume 34. Easy Costume Idea - Renaissance Girl 35. 10 Minute Homemade Jellyfish Costume 36. DIY Cat Costume 37. Lucy And Ricky Costumes 38. Easy Frozen Costumes 39. Easy Greek Goddess Costume 40. DIY Family Willy Wonka Costumes

101+ Handmade Halloween costumes at Creating Really Awesome Free Things

41. DIY No Sew Maleficent Costume 42. No Sew Pineapple Halloween Costume 43. Graveyard Bean Bag Toss: Trunk or Treat Car Costume 44. DIY Teenage Mutant Ninja Turtles Costumes 45. DIY Raccoon Costume with Printable Mask 46. Easy WildStyle Lego Movie Costume 47. Simple Hello Kitty Costume 48. No Sew Minnie Mouse Costume 49. DIY Inspector Gadget and Penny Costumes 50. DIY Frozen Elsa Dress Baby Edition 51. Fairy Princess Dog Costume 52. DIY Hashtag Halloween Costume 53. Toddler or Baby Egg Costume 54. Easy No Sew Olaf Costume 55. DIY Baymax Costume 56. DIY Tooth Fairy Costume 57. Baby Short Stack Pancake Costume 58. Elephant and Piggie Halloween Costumes 59. Instagram Halloween Costume 60. Peter Pan & Mr. Smee Halloween Costume

     88+ Handmade Halloween costumes at ReallyAwesomeCostumes.com

61. Wildstyle Costume from the Lego Movie 62. Fred and Wilma Couples Costume 63. Viking Family Costumes 64. DIY Cruella de Vil Costume for a child 65. Disney Frozen Olaf Halloween Treat Bucket 66. How to Make a Minecraft Steve Head 67. DIY Harry Potter Costume 68. DIY Duck Dynasty Costumes 69. No Sew Cupcake Baker Halloween Costume 70. DIY Skunk Mask 71. Ghostbusters Proton Pack DIY 72. Frozen Anna Costume Tutorial 73. Candy Corn Costume 74. Paw Patrol Halloween Costume 75. No Sew Toothless Dragon Costume 76. DIY Robot Costume 77. Wonder Woman Costume 78. Reese's Peanut Butter Cup Costume 79. Thrifted Gentleman Spy DIY Halloween Costume 80. DIY Boy Garden Gnome Costume 81. Group Costume: Bob Ross, Happy Tree, & Squirrel 82. DIY Blues Brothers Costumes 83. Snow White Costume 84. Peacock Princess Costume 85. Scarecrow Costume 86. Easy Teenage Mutant Ninja Turtle Costume 87. Handmade Teddy Bear Costume 88. Princess Elsa and the Spy Kid 89. DIY Baby Koala costume

HAPPY HALLOWEEN! I CAN'T WAIT TO SEE WHAT YOU CREATE!


xo

***************************************************

Here are more ghoulish delights from me!


***************************************************

Expecting a little boo soon? Buy a Maternity Countdown Shirt HERE!


Thursday, November 7, 2013

How to Dye Fabric {with your washing machine}

Why would anyone possibly want to dye fabric?? I get for making your own clothes, or maybe quilting, or sewing, or something else that this girl doesn't do. But seriously - I never thought I would be purchasing fabric dye - using it - and loving it. But I did. To make a DIY Baby Wonka Bar Costume. Click the link to read all about that little Halloween chocolatey adventure! I needed a brown baby nightgown, but that kind of didn't exist either. Anything I found was too patterned or way too pricey. ENTER: FABRIC DYE. I ordered a white, cotton baby nightgown off Amazon for $13 {plus free shipping through Amazon Prime}, plus the $3 bottle of fabric dye and my project is costing me less than $20. And it REALLY WAS EASY! The fabric dye instructions are clear and, if you follow them, you won't fail. Oops. I didn't follow them the first time and, yep, I failed. Turns out - fabric dye does not like polyester. So don't do it. Don't try. Don't think you'll be the magic exception, because you won't be, like I wasn't. Just stick with the approved fabrics. CLICK HERE for a link to the FAQ section of Rit Dye's website. It was super helpful and answered any questions I had! I only used RIT Dye, because it is sold at Joanns, so easy to obtain that first errr second bottle of dye.


Supplies
  • Fabric dye
  • Fabric
  • Washing machine {I used my washing machine, but you can do it by hand!}
  • Dr Pepper {yep, a total necessity for the wait time during washing}

 The Fun Part
  • Set the temperature to wash HOT and rinse COLD.
  • Set the cycle to wash twice and rinse once. My washing machine has an 'auto soak' setting, so it basically washes it for a long time, then rinses once. If yours doesn't have this setting, just watch for when the wash cycle finishes, then RESET to wash again.
  • Start the water running. Wait until it gets about half full, then add the fabric dye. I used the entire bottle, just to be sure, and I knew I wouldn't need to save it for any reason. The link above to the FAQ section of RIT Dye gives details on how much to use depending on what you're dying.
  • The fabric needs to be unfolded and damp before adding to the dye. This is super important! I didn't unfold my fabric on one item and it came out splotchy! I just use the running water to dampen my fabric.
  • Once your fabric is damp and unfolded, add to your lovely dyed water.
  • Sit back - drink that DP - and wait for the magic to happen.
That's it! If you have to reset your washing machine after the first wash part, remember to pay attention, so you don't miss it. I hang my fabric to dry. The End!

SOOO easy, right?? I can't wait to try other fabrics for other projects. Fabric dye has kind of opened up my mind to a whole new world of color. Don't let not finding the right color of fabric or clothing item for your project stop you from fulfilling your chocolatey Wonka-y dreams.

"We are the music makers...and we are the dreamer of dreams." - Willy Wonka


Tuesday, November 5, 2013

DIY Baby Wonka Bar Costume

It all started when a certain spouse of mine decided Ava should be a WONKA bar for Halloween. *sigh* He might have a slight obsession with the Willy Wonka movie -- the old one -- not the Johnny Depp version. Well, you can't just go out and BUY a baby wonka bar costume. They don't exist. Even if you could, I wouldn't, because Halloween costumes cost one gajillion dollars. So I knew I had to get my craft on if I was going to make my husband's Halloween dream come true. And it really wasn't even that hard. I can't sew. Nope! I even have my grandmother's sewing machine, but I've never learned. That's definitely on my TO DO list. But, until then, it's a no-sew life for me. I decided to use fabric dye and fabric paint to make Ava's wonka bar costume. Like I said earlier - it wasn't even that hard. YES - I did fail the first time I tried fabric dye. And YES - I thought about giving up. And YES - I did eat almost 100 mike & ike's out of frustration. But it all worked out in the end.

SO.

To check out how to dye your fabric brown, click HERE for my Fabric Dye Tutorial.

In order to do this, you will need my Wonka Bar Costume stencil. You can find it {along with my other Free Printables & Stencils} by clicking on the links below:


Now, don't you feel super special knowing you are one of the ONLY people on the planet to have a Wonka bar baby costume stencil??!!!! Welcome to the cool kids club.

I'm definitely a visual learner, so the rest of the tutorial will be through pictures. Have fun! And remember -- candy is dandy, but liquor is quicker.

**Note: I used fabric paint, because I'm kind of obsessed with it, but you could use heat transfer material, too. Just cut out the different shapes and letters in the colors you want. That would work quite splendidly!**


Pull up the stencil file in Silhouette Studio. You'll have to change the settings to looks like these. The main ones to note are:  change the width to 9 and the height to 15 and change the cutting mat to NONE. These are the settings I used for a 6-12mths size baby nightgown. You can adjust to whatever size you need. 


**Hover over top left of photo to PIN!**
1. Load your vinyl in your Cameo or Portrait. I used 9" vinyl, but you can use 12" as well. 
2. In Silhouette Studio, send the file to the Cameo to cut. Once you choose the Vinyl as the item you're cutting, the rest of the settings change for you. Remember to make sure you have your blade in your Cameo set to what setting it shows on your computer screen. Once it's all set, press CUT! Sit back, and watch the magic.
3. Cut off your vinyl stencil!
4. Using your hook tool for assistance, peel away the letters and border, so you have the negative space left.
**here's a tip. if you don't have a hook tool {yet!}, i've used a fondue fork or even scissors to help peel away the vinyl. but the hook tool works the best!**
5. Apply the transfer tape to the front of your stencil. I peel a small portion off and press it on the end of the stencil, then peel & roll the rest of the tape over the stencil. Peeling all the tape off and then applying it to the stencil makes for lots of wrinkles.
6. Flip the stencil over and use your scraper tool to adhere the vinyl to the transfer tape.
7. Peel the transfer tape backing off. I use my hook tool to help press down any vinyl that didn't stick.
8. Keep that shiny backing piece. You'll use it later!
 9. Apply the stencil to your fabric. Carefully remove the transfer tape. Press over your stencil to make sure there are no bubbles.
10. Insert the shiny backing from the transfer tape you saved in Step 8 inside the nightgown. This will keep any fabric paint from bleeding through to the other side. What's nice about using this backing is that it doesn't stick to the dried paint!
11. Use your fabric paint to paint over the stencil. This is the fun part! Let dry for several hours {I usually leave mine overnight}. Peel away stencil and view your beautiful, delicious, scrumdiddlyumptious Wonka Bar!!


 As you can see, this is fun for a family Halloween costume set, but I think it would be cute for a Wonka themed birthday party! Which, knowing that certain spouse of mine, I could see being requested in the future.


xo

Here's more spooky inspiration for you {the coolest person ever!}:


Tuesday, October 29, 2013

Dinner In A Pumpkin Recipe

There are still THREE dinners between now and the day after Halloween, so you DEFINITELY have time to try this festive recipe. Fall is all about pumpkins, so I think you can make this through Thanksgiving!

My family has a tradition of making DINNER IN A PUMPKIN every Halloween. This was my first year making it for my own little family! It is a really REALLY simple recipe that you can modify easily to your family's taste. I serve it with rolls and find myself making a sloppy joe out of it. It's seriously SO good. My sister adds RICE to hers -- so that's a yummy suggestion to try, too. The best part is how soft and delicious the pumpkin gets while baking. It scoops right out. The pumpkin bite is THE YUMMIEST. You don't need a massive pumpkin, either. Make sure you pick one that will fit in your oven! Whether you're cooking for one, two or a family of eight -- this dish is sure to delight everyone. Enjoy!


Dinner in a Pumpkin
serves many! :)

One pumpkin {clean out seeds}
Two pounds ground beef or sausage
One can SPAM {ok ok you can use 1lb ground ham if you're not a SPAMmer}
One can tomato sauce {regular size can}
Two teaspoons oregano
Two cloves garlic, minced
Two and a half tablespoons onion
One chopped green pepper
One teaspoon vinegar
Three eggs, beaten
Two and a half teaspoons salt
One teaspoon pepper
{remember -- you can add minute rice, if you please}
{if you LOVE the pumpkin flavor, add a few shakes of pumpkin pie spice!}
*remove/add whatever you like - it's all yummy!*
Combine all but pumpkin and fry until tender. Place pumpkin on cookie sheet, then add mixture to your beautifully scooped pumpkin, place the lid, take your Instagram photo and bake at 350 degrees for ninety minutes. Serve dinner from pumpkin!

MMMMMMMmmmmmmm.

Now I want to eat it again.
In fact, I think I will.


**Like this post? Follow my blog! Click "Join this Site" on the right sidebar to get the latest and greatest from Put A Bird On It. If you do this by midnight, 3 of your friends will find their true loves, 400 kittens will get homes, and you will become filthy rich in the morning. ;)


Monday, October 21, 2013

Free Printables

I just wanted to share the LINK to my box{dot}com folder where all my Free Printables live and party. So maybe you'll want to join the fun.


Thursday, October 17, 2013

Candy Corn Cocoa

CONFESSION:

I don't like candy corn!!

There. I said it. I guess I have to wear my red letter A (or orange letter C?) around town this time of year. It just does nothing for me. I'm more of a reese's pumpkins / ghost peeps kind of girl. But basically everyone else in the world loves candy corn! It's the perfect Halloween treat. I created a little candy corn cocoa mix to give for my "You've Been Booed" treat {free printable HERE!}. It is easy, cute, and YUMMY.

What you'll need:

  • Mason Jar
  • Halloween Ribbon
  • Hot Cocoa Mix
  • Mini marshmallows {try the ghost mallows for a spooky touch!}
  • CANDY CORN
Simply layer the hot cocoa mix, mini mallows and candy corn in your mason jar. Close it up, add some ribbon, and you're done! Super easy, super cute, and super yummy, right?

I added a BOO! sticker I printed using Silhouette sticker paper and a couple stripey Halloween straws to finish it off.

And, to be honest, this kind of made me want to eat the candy corn...


If you make this, link it up! I'd love to see!


Wednesday, October 16, 2013

You've Been Booed {2013} free printable

Last year, I created a free printable for the fun neighbor "You've Been Booed" tradition. I didn't actually deliver them to anyone, though! I even made choco covered halloween Oreos and had them all in their bags with signs ready to go -- but kept forgetting to take them and then HALLOWEEN CAME AND WENT with my bags sitting by my front door. SAD!!! I couldn't be lame two years in a row, so I decided to actually deliver the treats this time! I wanted to make a new printable, just to start a tradition of making a new one every year. This time, I tried to play off the popular CHALKBOARD theme I'm seeing all over Pinterest. I made a door hanger BOO sign as an alternative to a sign you put up in your window. It was fun coming up with a design. I'm still so new at this! But I have fun, make mistakes, never think it's cute enough, change it a million times, then just STOP at some random point and print it out, because I'm tired of editing it! I also made up my own Candy Corn Cocoa mix {blog post coming soon!}.


Here are your download links. Happy Halloween!


Want to try Candy Corn Cocoa? Check out my posts HERE!


Here are more ghoulish delights from me!


***************************************************

Expecting a little boo soon? Buy a Maternity Countdown Shirt HERE!


Blog Design By Brand Me Beautiful