photo PABOI2.jpg

Weekly Digest

 photo PAGEShome1.jpg  photo PAGESlinkparty1.jpg  photo PAGESfeatured1.jpg  photo PAGESsponsor1.jpg  photo PAGESguestposts1.jpg

Search This Blog

Showing posts with label Silhouette Tutorial. Show all posts

Monday, October 13, 2014

Burlap & BOO Halloween Wreath

Close your eyes. Just for a moment. Take a deep breath. And ask yourself:

"What's hanging on my front door right now?!"

It's usually crickets in my head after I ask this question. I'm not awesome at updating my front door wreath...But not this month! I've seen so many pretty FALL wreaths on front doors in my neighborhood - I wanted IN on the festive fun. I whipped out my Burlap Wreath {easiest wreath EVER! and super easy to switch up for different holidays - >here's my POST< on that baby} and made it into a Burlap & BOO Halloween Wreath.


I used my burlap wreath (which is adorable just on its own) and made a second wreath to go in the middle. I thought it added unique dimension to the usual holiday wreath. The inner wreath is a foam wreath form wrapped in my favorite black & white polka dot fabric (hot glued into place). Then, I used a mustard yellow wired twine to wrap it around the burlap wreath and hang my BOO banner. Mustard yellow is a MUST for this fall {see more mustard yellow inspiration HERE}.

The BOO banner was inspired by A Beautiful Mess and their BOO Banner. Adorable, right? Their tutorial is pretty simple, but I simplified it even MORE by making a mini version - skipping the sewing {cause y'all know girl can't sew} - and used my Silhouette Cameo to cut it out of fabric. If it was any easier - a cave man could do it. And they should. Cause you can't tell me their caves couldn't use a Burlap & BOO Halloween Wreath.

This month, I'm taking part in a Silhouette Challenge, along with the bloggers of "The Silhouette Challenge" group on Facebook. If you have a Silhouette, you should totally join this group! This is the first monthly challenge I'm part of, but I enjoy being part of the group every day. Ask questions - show off your projects - learn about Silhouette promos - and get mad inspired. For this challenge, I'm going to share the tutorial for making your own Mini BOO Banner with a Silhouette cutting machine! I used the Cameo, but you can totally use a Portrait. In fact - I used the Portrait cutting mat in my Cameo for this very banner. {remember - so easy - the cavemen - cool}

How to Make a Mini BOO Banner with your Silhouette Cutting Machine

Supplies
  • Black fabric {I bought 1/4 yard of broadcloth and had TONS left over}
  • No-sew fabric interfacing {I bought Heat 'n Bond, but Silhouette sells a great one, too}
  • Iron & Ironing board
  • Very thin wooden dowel {29cents at Hobby Lobby}
  • Black yarn | twine | pipe cleaner
  • Scissors
  • Glue gun
  • Silhouette Cameo or Portrait
  • Silhouette cutting mat
**I have an awesome, FULL tutorial with photos for how to cut fabric with your Silhouette machine. You can view it by clicking > HERE < -- it is very detailed, so I'll just give the brief version here.**

Step 1 || Prep fabric for cutting
  • Cut fabric to size and iron interfacing to fabric.
  • Remove back of interfacing and cut down to size to fit on cutting mat. *I used the Portrait mat in the Cameo*

  • Place fabric on cutting mat. Load into Silhouette machine. Send your "BOO Banner" design in Silhouette Studio to CUT {the fun part!}.
  • Peel off & discard excess fabric. Cut your wooden dowel down to size, leaving an inch or so on each side. Line up the dowel on the top back of your BOO banner, with enough fabric to wrap over the dowel to cover it. Place a line of hot glue along the dowel, wrap the fabric over and glue into place.
  • Admire your adorable BOO you made! 
  • Cut your twine or yarn to size {if you use a pipe cleaner, it's already the perfect size} and tie each end onto one end of the dowel. You're done! Congrats! You just made a mini BOO banner -- perfect for attaching to a halloween wreath.


Since you can never have enough inspiration {hello, that's what keeps Pinterest in business!}, here are the links to my Silhouette friends' posts -- all projects made with a Silhouette machine -- all having to do with this month's theme: FALL! I recommend pinning these projects, or at least this post, so you have all the links. Serious PINspiration going on here! Enjoy!


Paper Rosette Fall Wreath Hello Fall Sign Halloween Paper Bag Luminaries Spooky Mantle Ghost Town Dollar Store Placemat Jack O' Lantern Copper and Paper Embellished Pumpkins Ugly Sweater Wineglass Charms DIY Fall Leave Paper Wreath Starry Pumpkin Burlap & BOO Halloween Wreath Fall Paper Petals Fall Leaves Favor Tags 15 Minute Customized Halloween Buckets Gravestone Treat Bags with Free Cut File Beware of Zombies Halloween Shadow Box Welcome Sign Vampire Bat Specimen Boo-tiful Halloween Treats Little Turkey No Sew Thanksgiving Onesie Frozen Halloween Treats & Free Printable Fall Leaf Keychain Fall Lovin October Silhouette Challenge Punny #Hashtag Halloween Costume Still Falling For You Card DIY Etched Leaf Coasters
1. Create & Babble // 2. Lil Mrs. Tori // 3. unOriginal Mom // 4. Zanaree // 5. The Kim Six Fix // 6. One Dog Woof // 7. Cupcakes & Crowbars // 8. Living My Given Life // 9. Architecture of a Mom // 10. Put A Bird On It // 11. Just Add Paper // 12. Weekend Craft // 13. Silhouette School // 14. Minted Strawberry // 15. My Paper Craze // 16. McCall Manor // 17. Chicken Scratch NY // 18. Mama Sonshine // 19. Creative Ramblings // 20. From Wine to Whine // 21. Please Excuse My Craftermath... // 22. Dragonfly & Lily Pads // 23. The Thinking Closet // 24. Simply Kelly Designs // 25. Sandpaper & Glue //

xo


Here is more Silhouette inspiration from my blog! Grab some cider, put on your cardi, turn on some Hilary Duff and kick it here for a bit...


Wednesday, May 28, 2014

My Review of Silhouette Stencil Material *spoiler alert: it's amazing!*

Hi everyone! Sorry I've been a little MIA lately...we are still living at my dad's and YEP my craft box is STILL packed up.  :(  BUT - I'll try really hard to make it up to you with lots of fun crafts when I get my own house with my own craft room (hopefully!). We put in an offer on a home today, but the house is already under contract, so we are just a backup offer. We probably won't get it, so we are continuing to look...hoping we find that one special home soon!

Today, I've got a Silhouette tutorial for you. I originally guest posted this on Get Silvered and am excited to share it with you guys now! For those of you who don't know, I own the Silhouette Cameo and L-O-V-E it. I use it for almost every craft I make.  One in particular is the Maternity Countdown Shirt that I sell {SHOP}. I make each shirt by hand and would cut out a stencil for the numbers each and every time. It was kind of time consuming and used up a lot of vinyl per shirt. Just a couple months ago, I found out that Silhouette sells a -- you ready for this? -- REUSABLE STENCIL MATERIAL!!!!!! I pretty much freaked out and immediately bought some to try out. Well, it's AMAZING! It's basically a thin plastic that I use over and over and over again. I make so many shirts with one stencil - it saves me SO much time and money. This post is all about my review and a tutorial for cutting and using it!


The Stencil Material comes in a tube. This is great for storing, but not totally great for the stencil material itself. Mine had a few bubbles (you can see in pic below) which made me think at first that the cutting part did not cut all the way through. I was happy to see when I unloaded it that it did cut perfectly - I just had to pull the stencil off the paper backing carefully to make sure it came off along the cut lines in a couple of places. {addition: since I wrote this review, I've purchased more stencil material, and it didn't bubble. Maybe it was just my first try...!}

Tuesday, April 8, 2014

Substitute Teaching at Silhouette School

Hey friends! Wake up! It's time to get to school! No...you can't have 5 more minutes. Go!

Today, I am substitute teaching at Silhouette School, an awesome blog that teaches you all about using your Silhouette cutting machine. That is SO not a school I'd want to miss one day of. You will love Melissa and her fantastic blog all about my favorite cutting tool.


I am sharing my tutorial for How to Cut Fabric with your Silhouette. The post on Silhouette School links back to my tutorial, but you should definitely stop by and thank Melissa for having me sub for her class. Also, whether you have a Silhouette or not, you have to check out all the amazing projects on Melissa's blog. It's a giant blog of inspiration for any type of project!


xo


*********************************

You may also like


Tuesday, March 25, 2014

Guest Posting at Get Silvered ... How to use Silhouette Stencil Material ... PLUS an Ad Space Giveaway!

What up, peeps? Today, I have the pleasure of hanging out at Get Silvered, where I am sharing my review of Silhouette Stencil Material. Spoiler alert: IT'S AWESOME! I use vinyl for stencils ALL the time - mainly for making the Maternity Countdown Shirts I sell online - and making a new vinyl stencil for each one takes up a lot of vinyl. I was intrigued when I saw that Silhouette sold a "stencil material" that was reusable! Head over to Get Silvered to see my full review and get a tutorial on how to use this kick A stuff. :)


WAIT!

HANG ON!

DON'T GO!

I'll miss you.

To keep you HERE ... I have an exciting announcement!

Tuesday, March 18, 2014

Silhouette Cut File and Card Tutorial ... Guest Post by Pam from Get Silvered

Hello, I'm Pam from GetSilvered.com and I'm so happy to share a project here at Put a Bird On it.
Thank You Daniela, it's a pleasure to be contributing to such a creative site.


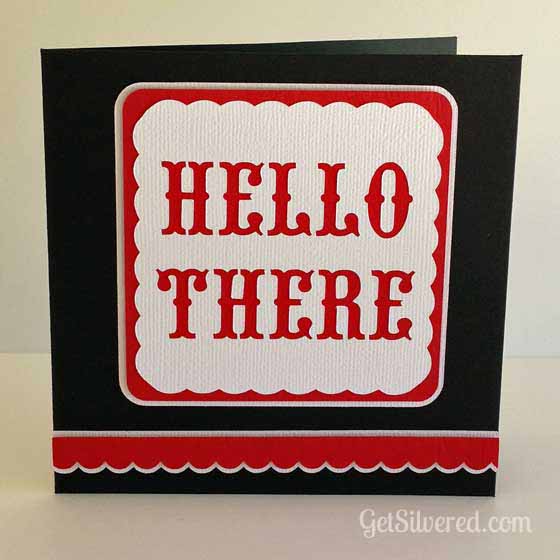
I'm sharing a Cutting File and instructions to make this cute card with a Silhouette Cutting Machine. It's perfect for many occasions and best of all - it's quick and easy.

Supplies:

3 Colours of Card stock |  Silhouette Studio File >> Free Download here  | Double Sided Tape  |  Double Sided Foam Tape & Squares  |  Glue Pen  |  Scissors  |  Silhouette Cutting Machine  |  Patterned Paper (optional)  |


Instructions:
  •  Download & open the free file in the Silhouette Studio Software 
Cut The Pieces:
  • First cut the card base: Load the Black Cardstock onto the cutting mat and into the Silhouette, then adjust the Cut settings in Silhouette Studio to correspond with the thickness of cardstock being used.
  • The files are laid out as in the screenshot below. Ungroup & move the other shapes off the Virtual Mat on the computer screen, leaving only the card base and select ìsend to Silhouetteî
  • Repeat again to cut out the Scalloped Borders, Squares and Text overlay with the contrasting cardstocks. Refer to the colour guide on the file (see screenshot above) & change cardstock on the real cutting mat and move the various shapes on or off the virtual cutting mat as needed.
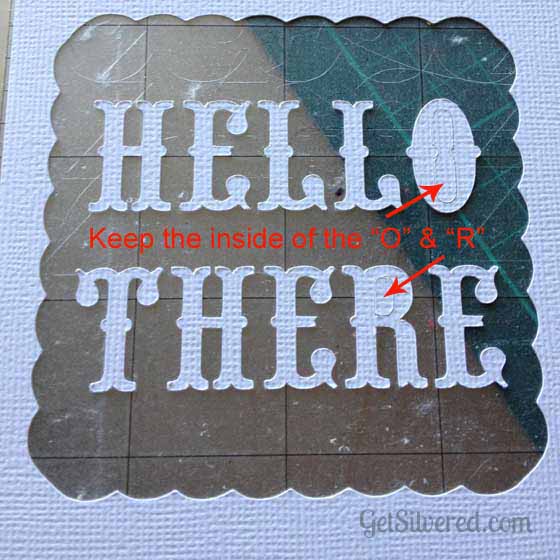
  • When removing the text panel from the cutting mat, keep the cut outs from the centre of "O" & "R" as theyíll be needed  later. You may be able to save the letters for another project too.

Assemble the card:
  • First, attach the White Text overlay to the Red backing Square. Use Double sided tape on the back over the solid areas and a glue pen around the intricate cut out sections near the letter cutouts. 
  • Now fix the combined layers to the large white backing square with Double sided foam tape. Apply the little foam squares (or foam tape cut to size) to the back of the red scalloped border and attach that on top of the larger white scallop. Using the foam tape gives dimensional interest to the card. 
    • Carefully position and attach the assembled panels and scallops onto the Card base with Glue or Double Sided Tape. Attach the middle pieces (if you haven't already done so) of the "O" & the "R" that you saved earlier.
     
      
     Options:
    • You can really change the style depending on the materials used. I love the Red, Black and White colour theme, but just for something different I made another version too.  This time I used a patterned paper instead of a contrast card, and added an extra scalloped border. 
    • I didnít have any card or paper in a wood grain pattern so I attached contact paper to a piece of plain cardstock and then cut it all together using the heavy cardstock settings in the program.
    • The cards are blank inside, but you could add an extra panel with a printed greeting or add a cut out sentiment or a sketch pen greeting. If sketching or printing, do it before you cut out the card base.
    • You can add extra design elements inside too ñ I added a scalloped border & a heart to the inside of the Kraft card to pretty it up!
    Enjoy this easy card project and the Free Cutting File. If youíre looking for more Cardspiration, there are lots of other Free Cutting Files at Get Silvered if youíd like to take a peek, or follow my Facebook page  for all the latest updates.
     
    Next week, Daniela will be contributing over at Get Silvered. I'm really looking forward to her awesome Home Decor project. Be sure to look out for it!


    *****************************


    Thanks, Pam! I asked Pam to do a card project, because I don't tap into card making & paper crafting as much as I would like to. I love seeing all the intricate layouts that scrapbookers do. I definitely want to get into making homemade cards, since I have a Silhouette Cameo.

    Here are some of my fave posts from Get Silvered:

    **EEEK! This idea is total #swoon


    What is your favorite thing to make with a cutting machine? I love hearing all the different things people create! Have a great day!

    xo

    Enter to win Ad Space on my blog for the month of April! Click HERE!

    Let's be photo junkies together >> Instagram @putabirdonitblog

    Monday, March 17, 2014

    How to Cut Fabric with a Silhouette Cameo & St. Patrick's Day Wreath

    HAPPY ST. PATRICK'S DAY!!

    ARE YOU WEARING GREEN?!


    Ok, I just love holidays! Even if I don't go all out celebrating them every year. Nope - no St. Patrick's Day mantel or treats at my house! Bad craft blogger - I know. :) But I try to do something for each holiday. I did make Shamrock Cupcake Toppers last week {click HERE for the tutorial!}. I also made an easy, last minute St. Patrick's Day Wreath for my front door. I did it in under 30 minutes Saturday morning while my lovies slept in {"lucky" them!}. I took my polka dot birthday wreath {HERE} and upcycled it into this little number. Best part of my project? Cutting fabric with my Silhouette Cameo! Even bester part? I got a NEW CUTTING MAT! I've been cutting with an old, non-sticky mat {think painters tape being used to hold down my card stock! boo}. It was a DREAM cutting fabric with my new mat and my Cameo. Total dream. I cut this adorable white shamrock fabric into pennants for the banner on my wreath. On to the tutorial!

    > PIN IT <

    Supplies

    Fabric  | > Interfacing <  |  Iron  |  Scissors  |  Silhouette Cameo & Cutting Mat

    The Fun Part

    Tuesday, February 11, 2014

    DIY Glitter & Gold Heart Sleeves made with Homemade Fabric Paint ... And A Silhouette Studio Tutorial


    I am SO EXCITED about this tutorial. I've been anxiously waiting to post it, because it is one of my most favorites ever, and I've been wearing this cardi every day for five days. Yep. I am quite obsessed with gold + sparkles right now. Plus, add HEARTS on top of that, and you can safely use #SWOON. I love the look of elbow patches, but girl can't sew, so I had to  come up with a different way to get the look. I decided to use homemade fabric paint {I have a tutorial for making your own fabric paint - check it out HERE}. I absolutely love making my own fabric paint. It is SO inexpensive, and I never seem to run out. I used acrylic GLITTER paint for the first time. I was nervous, because I didn't know if it would work well as a fabric paint. I was over the moon happy with the results. The glitter paint worked out beautifully.

    This project was SO EASY, I can't stress the EASY factor enough here. I made it in about 20 minutes the night before Build Your Blog Conference, because I wanted to wear this cute cardigan to the conference. I definitely wore my heart on my sleeve that day. :)


    Here's what you'll need to make your own cute heart-on-my-sleeve shirt:


    The Goods

    Shirt {I used a cute cardi I got on sale at Target}
    Heart Stencil {I cut mine out of vinyl using my Silhouette Cameo}
    Fabric Paint {2 parts acrylic paint + 1 part fabric medium}
    Foam Brush

    Here is the tutorial for making a stencil using a Silhouette Cameo. I just LOVE my Cameo, guys. I use it almost every day. It's rare for me to make a project without using it in some way. I thought it'd be helpful to show how to make a heart stencil out of vinyl using the Cameo and designing it in Silhouette Studio. If you don't have a Cameo {yet!}, you can skip this part and go to the next part about painting on your shirt. You can make a stencil out of freezer paper or buy a heart stencil from the store. After seeing how easy it is with a Cameo, though, you might be headed out to get one for yourself.


    *I know it seems like a lot of photos, but I swear it is SO easy. Don't let the photos scare you - I just like taking photos, ok?! ;)
    Blog Design By Brand Me Beautiful