I just have to post about a couple places I've been FEATURED THIS WEEKEND!
Yesterday, I was talking to my husband about how much I love this blog and crafting. It's my new hobby -- something I can put my time and creative energy into -- something I love doing. And even if it's just for me, I love it, and will keep doing it as long as I love it. But I told him -- I just live for a comment on my blog. It's pretty pathetic, ha ha. But I always check to see if I have a comment awaiting moderation. More confessions! Oh, well, it's sad, but it's rewarding when I think that someone likes something I've posted, and it helps me think I might actually be ok at this little hobby of mine. Well, this weekend I have had TWO AWESOME moments of being able to think I'm doing ok. I was featured - twice - on two awesome BLOGS!
The first was by Confessions of a Plate Addict, who featured my You've Been Booed Printable.
Then, as if it couldn't get any better, I had a comment from the fabulous, amazingly talented Linda from Craftaholics Anonymous saying she featured my Candy Corn Cocoa on her Craft Therapy post on Facebook. SERIOUSLY I ABOUT CRIED. Because she is THAT amazing and it is an honor to know she even GLANCED at my blog and thought that something I created was worthy of being featured on her Facebook page. And it just made me feel so cheesy and so good.
So tonight, I am on cloud nine - no - cloud TEN. Just feeling like maybe -- just maybe -- I'm ok at this little hobby of mine. :)
Search This Blog
Saturday, October 19, 2013
Thursday, October 17, 2013
Candy Corn Cocoa |
CONFESSION:
I don't like candy corn!!
There. I said it. I guess I have to wear my red letter A (or orange letter C?) around town this time of year. It just does nothing for me. I'm more of a reese's pumpkins / ghost peeps kind of girl. But basically everyone else in the world loves candy corn! It's the perfect Halloween treat. I created a little candy corn cocoa mix to give for my "You've Been Booed" treat {free printable HERE!}. It is easy, cute, and YUMMY.
What you'll need:
- Mason Jar
- Halloween Ribbon
- Hot Cocoa Mix
- Mini marshmallows {try the ghost mallows for a spooky touch!}
- CANDY CORN
I added a BOO! sticker I printed using Silhouette sticker paper and a couple stripey Halloween straws to finish it off.
And, to be honest, this kind of made me want to eat the candy corn...
If you make this, link it up! I'd love to see!
Labels:
gift ideas,
Halloween,
party ideas,
Silhouette Cameo,
sticker paper
Wednesday, October 16, 2013
You've Been Booed {2013} free printable |
Last year, I created a free printable for the fun neighbor "You've Been Booed" tradition. I didn't actually deliver them to anyone, though! I even made choco covered halloween Oreos and had them all in their bags with signs ready to go -- but kept forgetting to take them and then HALLOWEEN CAME AND WENT with my bags sitting by my front door. SAD!!! I couldn't be lame two years in a row, so I decided to actually deliver the treats this time! I wanted to make a new printable, just to start a tradition of making a new one every year. This time, I tried to play off the popular CHALKBOARD theme I'm seeing all over Pinterest. I made a door hanger BOO sign as an alternative to a sign you put up in your window. It was fun coming up with a design. I'm still so new at this! But I have fun, make mistakes, never think it's cute enough, change it a million times, then just STOP at some random point and print it out, because I'm tired of editing it! I also made up my own Candy Corn Cocoa mix {blog post coming soon!}.
***************************************************
Expecting a little boo soon? Buy a Maternity Countdown Shirt HERE!
Here are your download links. Happy Halloween!
Want to try Candy Corn Cocoa? Check out my posts HERE!
Here are more ghoulish delights from me!
***************************************************
Expecting a little boo soon? Buy a Maternity Countdown Shirt HERE!
Labels:
Halloween,
Paper,
printables,
Silhouette Cameo,
super easy
Saturday, October 5, 2013
Make the Most of Conference ~free printable~ |
You may know this weekend is General Conference for The Church of Jesus Christ of Latter Day Saints! If not, you can go HERE {www.lds.org} to find out more about this fantastic weekend, where people all over the world get together at the conference center, stake centers, ward buildings, and their homes to listen to a prophet's voice. It truly is a weekend just meant to inspire, to uplift, to lighten the load, and to give hope! Well, it's not just for adults -- it's for kids, too. And as hard of a time as I have sitting still during conference (yes, I admit to being a phone troll during a talk or two), it is even harder to get kids to get excited and interested in remembering conference weekend. My husband and I teach a youth Sunday School class for our church, the kids are ages 12-14. I wanted them to remember conference weekend! So I found this cute handout reminding the kids to Make the Most of conference. I found the phrasing online, but created my own, simple version of the handout in cute fall colors. I attached it to packets of M&M's, used some cute ocean blue ribbon to tie it together, and delivered it to our Sunday School kids the day before conference -- to remind them to watch! I hope this small gesture helped them tune in to a talk or two -- because you never know when you are going to hear something that just might lift your spirits or make your day a little easier.
As always, here are your links to download!!!!!
Wouldn't the M&M's be perfect to then use for Conference Bingo?!?!
Labels:
fall,
gift ideas,
LDS,
Paper,
printables,
Silhouette Cameo,
Sunday School,
super easy,
uplift
Wednesday, August 21, 2013
One Frame --> 2 Ways! |
If I said:
"Give me one Dr Pepper and I'll give you back a Dr Pepper and a bag of peanut butter M&M's,"
You would say:
"Heck yes!"
Right?
Of course.
So this tutorial is basically like that.
If you love Ikea, raise your hand. *raises hand*
I love their picture frames -- especially this beaded one. Following this tutorial, you can get TWO cute display pieces out of just ONE frame, using the frame itself and the frame back w/ stand piece.
FRAME with BANNER
For this project, I took everything out of the frame and just used the frame itself. I used Silhouette Studio to create the pennants for my banner. The background of each letter is pink toile -- which matches the curtains in the nursery. The awesome thing about using a Silhouette cutting tool is that it cuts the holes for you for hanging with ribbon or twine or whatever you choose! I used bakers twine. Then, I just taped it to the back of the picture frame. You can't see the back, so no one will see your tape. :) Voila! Project Uno.
FRAME INSERT w/ STAND AS PICTURE HOLDER
This has to be one of the easiest projects I've ever done, and it is one of my faves! It is so simple -- which is my favorite thing about it. All you need to do is take the back piece of the frame (that has the stand attached to it) and hot glue a piece of burlap over the front. I cut my piece a couple inches wider than the frame insert, so I could wrap it around and hot glue it to the back. Again, the back doesn't have to be perfect, because no one will see it! Then, I attached a bronze mini clip to the front burlap {again, with hot glue}. That's it! I love it, because I can switch out the photo any time I want. Voila! Project Number 2.
Well, there you have it! A simple way to take ONE frame and make it into TWO adorable ways to display your favorite banner, saying, or photo. Mine are special pieces in Baby A's nursery. :) Have fun!
FRAME INSERT w/ STAND AS PICTURE HOLDER
This has to be one of the easiest projects I've ever done, and it is one of my faves! It is so simple -- which is my favorite thing about it. All you need to do is take the back piece of the frame (that has the stand attached to it) and hot glue a piece of burlap over the front. I cut my piece a couple inches wider than the frame insert, so I could wrap it around and hot glue it to the back. Again, the back doesn't have to be perfect, because no one will see it! Then, I attached a bronze mini clip to the front burlap {again, with hot glue}. That's it! I love it, because I can switch out the photo any time I want. Voila! Project Number 2.
Labels:
Baby,
burlap,
frames,
gift ideas,
no sew,
Silhouette Cameo,
super easy
Friday, August 16, 2013
KEEP CALM and TAG ON {glow in the dark shirt & printable} |
Sweaty palms.
Neon.
Ducking.
Spinning.
Plotting.
Aiming.
Shooting.
Tom Cruise.
Ok, that last one isn't a part of it. But the rest is describing a wicked awesome night playing laser tag. I can be a 24-year old mother of 1 and still LOVE laser tag right?? Two weeks ago was girls night in my family, and these ladies didn't pick shopping -- or a pedicure -- or drooling over the latest Channing Tatum movie {which I wouldn't do; did anyone else think he put on a few L-B's in the new G.I. Joe??!} -- these ladies chose LASER TAG. Unfortunately, my only part in the evening was showing up in this really, really ridiculously good looking GLOW IN THE DARK LASER TAG SHIRT,because this was the night my poor sweet husband slipped down the stairs while holding our poor sweet baby and she broke her poor sweet leg! So I was whisked away to spend the night in the ER. But I'll always have this picture of me looking the part.
Come on. You KNOW how badly you want a glow in the dark KEEP CALM and TAG ON shirt. And you can have one! All you need are the following:
- T Shirt {I used a black 3/4 sleeve tee I had in my closet that hadn't been worn in awhile}
- Glow In the Dark Heat Transfer Material {I used white and bought mine for a steal from Pick Your Plum}
- Iron
I'm sharing the Silhouette Studio file for my design!! Click the link below
If you don't have a Silhouette cutting machine {and you should!}, then here is a file to print a stencil to use with fabric paint & freezer paper. You can still make a fab T shirt!
I also have two FREE PRINTABLES if you just want the image! This would be fab to use for a laser tag birthday party, your Awesome Quotes board on Pinterest, or even framed and put next to your bed on your nightstand, so you can dream about your next great laser tagging adventure.
**If you make anything inspired by one of my projects, LINK IT UP! I'd love to see and SHARE!**
Wednesday, August 14, 2013
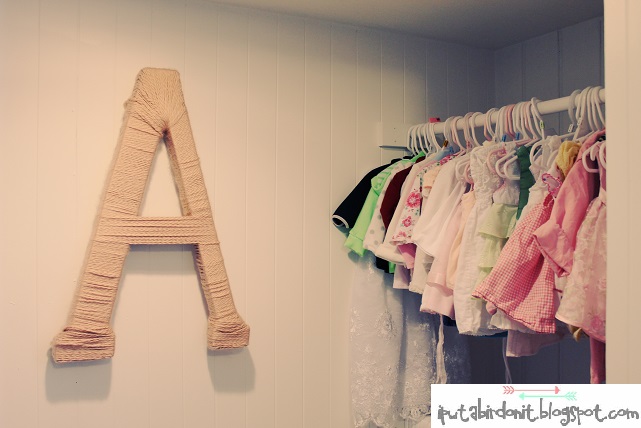
Baby A's Nursery {yarn wrapped letter} |
I'm excited to share some projects I've done for Baby A's nursery! It will only take me until her first birthday to have her nursery FINISHED, but oh well! Slow and steady wins the race. The crafty little nursery race.
I've had this project in the works for a WHILE. You would think wrapping a letter in YARN would be super easy, but it kind of isn't. Well, it is WAY easy. It just takes time. And the following:
- Giant letter {I got a paper mache one from JoAnns}
- Yarn of your choosing
- Glue gun & extra sticks
- Scissor
- Ginger Ale
- Mike & Ike's
- Roman Holiday
The last three are optional -- but definitely help pass the time!
I didn't take pictures of the process {bad blogger!}, but I did find an AWESOME tutorial by My Sister's Suitcase to link up to:
I'm having troubling deciding WHERE to hang this lovely lady in the nursery.
Here are the options!!
IN THE CLOSET
BY THE WINDOW
or
BY THE BOOKSHELVES
What do you think???
Labels:
Baby,
gift ideas,
no sew,
super easy
Subscribe to:
Posts (Atom)